Painting 10mm Dropzone Commander 'United Colonies of Mankind' Dropships... The Condors
So its been a little while since my last blog post and I thought that it may be interesting for those of you who keep asking me about techniques and I how I do things with my UCM forces the actual process that I go through to get my 10mm Sci Fi minis game ready.
One of the most ubiquitous assets available to UCM commanders is the Condor Dropship, and as I have 11 of these bitches to work my way through I thought using the first three to put together a painting tutorial would be a grand idea.... so here we go...
1. The plastic Condors require a little building and unlike every resin kit that Hawk Wargames do, it has a clear canopy. In the interest of continuity across the collection I will be painting over this. The build is thankfully really easy and takes no more than 5 minutes to get it ready for painting.
2. The first step is to put a layer of black primer over the kit. Whether this is done by spray can, airbrush or brush is irrelevant so long as its a thin even layer with suitable paint. The primer layer allows further paint layers to bond properly with the surface of the kit without which your kit will suffer from significant flaking as it is handled through the games it will be used in. ALWAYS prime ladies!
3. I am a big fan of my airbrush now (which is ironic as I had it sitting in an attic for almost 15 years before I dragged it out and decided it was perfect for my UCM). Ive cheated a bit on this kit as I know significant other layers are going to be applied, but Ive opted to utilise my priming level as one of the three block colours that I use for my Urban Camouflage scheme.
The first step of airbrushing after applying the first layer of paint is to apply the stencils for the blocks of colour that are least dominant on the final image. In the case of my UCM the colours are Olive Green, Buff and Black, the black being the least dominant. As you can see from the image above I have applied a collection of stencils that I have used multiple times onto the body of the Condor. Whatever colour I spray over the top of these stencils now will leave black blocks in the shape of the stencils when all the stencils have been removed.

4. Over the top of these freshly applied stencils the second layer of paint is applied. I use Tamiya XF-57 Buff mixed with Tamiya mix with Tamiya XF-20 Enamel Thinner with a ratio if 1:1. With doing these large block colours I always use a wide spread high delivery nozzle. This means that a lot of paint is used BUT the time that it takes me to do is cut by about 70%. A couple of passes and a couple of adjustments for hidden angles and Bosh! Job Done!
Another good thing about these Tamiya paints and application with an airbrush is that it dries REALLY quickly so you can get almost straight onto the applying the stencils for the blocks of Buff that you want to keep whilst applying the most dominant colour.
5. With the second layer of stencils you should apply slightly more and slightly larger ones that on the previous layer of stencils. The previous stencils that you have painted over should be left on and the new stencils applied above and next to them in an interlocking fashion.
The next colour to be applied is the last colour to be applied by dry brush and should be the most dominant colour on the miniature. To achieve this you need to make sure that, whilst the previous stencils are all interlocking there should be more space that will be occupied by the green paint on the non stencilled areas than on the stencils which will be removed to reveal Black and Buff anyway.
6. The green that I use for the dominant colour is Tamiya XF-58 Olive Green, again diluted 1:1 with Tamiya XF-20 Enamel Thinners. Again sprayed with the wide spread high delivery nozzle making sure to get in all of those nooks and crannies.
NOTE: Before you remove the stencils make sure you leave them on over night so that the paint can cure and bond to itself. The stencils, whilst being low tack stencils still have enough to tack to pull away a lot of the paint that has been applied...
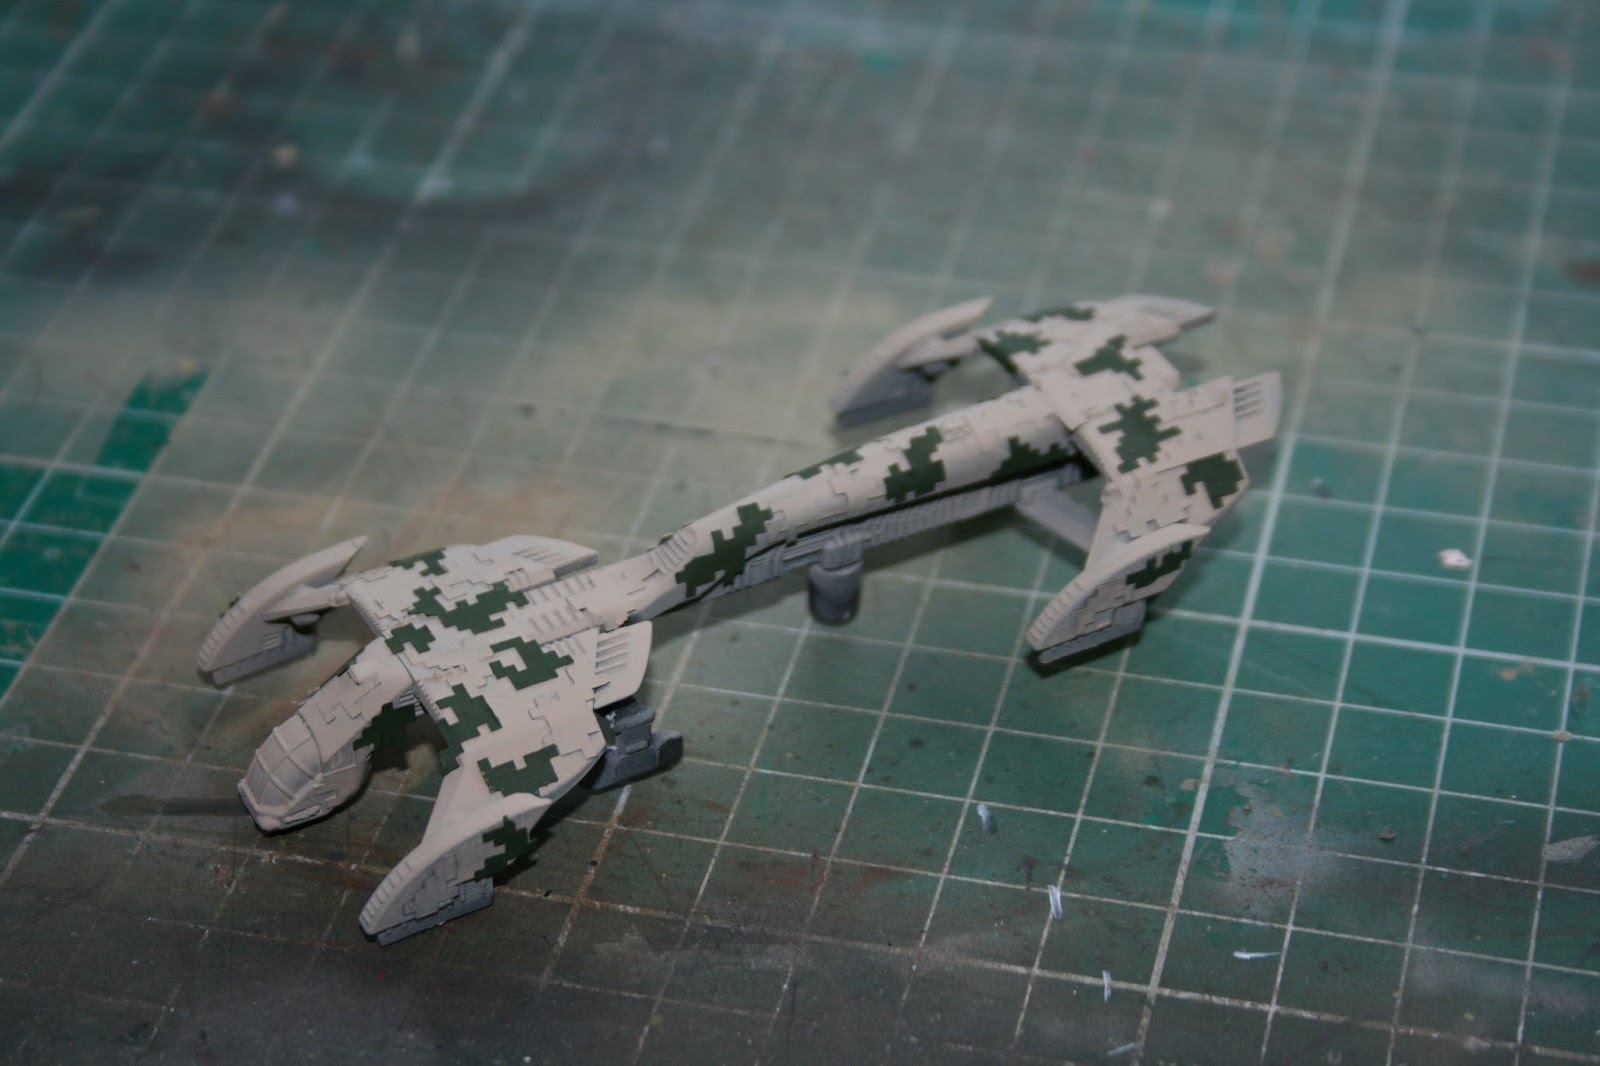
7: Which is what happened here. Having removed all of the stencils and stored them safely away on their stencil sheets for future use you can see just which parts of the miniatures paint cover is damaged. This is a proper ball ache because for this miniature to become presentable now, each section that has had paint pulled off of it will need to be manually repaired... and unfortunately Tamiya paint does not lend itself very well to the paintbrush in my opinion!
8. But repair it I did. Painstaking and a little disappointingly lumpy but for the tinting and profiling to come it is useable.
9. At this point we have a pretty sterile looking toy. Sure the patterns are pretty but lets be honest; it looks like the My Little Pony of military hardware at the moment so we need to dull the vehicle down and provide some uniformity across the paint range.
The first step in doing this is to apply a Filter! This provides a colour adjustment that is uniform across the whole model which will help to make the model look like an homogenous piece.
The Filter that I use for this type of camouflage is AK Interactives AK076 Filter for NATO Tanks which I apply quite heavily across the whole model. Its an enamel application so odourless White Spirits need to be used to clean your brushes but its well worth it. Already we can see that it has changed everything. The gritty grimy heavily abused hardware look that we all know and love is starting to come through now.
10. We don't stop at a Filter though as its not strong enough to provide the depth contrasts across the miniature that will make the detail pop through when you are looking at it on a war-games table.
We do a step called Profiling now, and for this I use another AK Interactive's product; AK075 Enamel Wash for NATO Vehicles.
An enamel Wash will have far more pigment in its suspension and because of this I apply it quite heavily around all of the grills, weapons and knobbly bits all across the model. I also use the Wash to do something called Pin lining where all of the grooves that travel along the panel lines across the model are picked out by applying the Wash along these grooves with a fine brush and a reliance on capillary action.
The trick here is to leave the model to dry out for about an hour and then come back and with either a brush with a bit of White Spirit on it or a Cotton Bud dipped in White Spirit go over the model and remove the excess Filter and Wash... of which there will be much.
This leaves much cleaner surfaces whilst leaving all of the contrasts and definitions.
11. Flying military vehicles are rarely painted in a uniform single colour (one possible exception to this which sticks out in my mind is the French Aeronavale in Indochina in the '50's that had a uniform blue all across their planes BUT their opponents had no AA capability at all so it was safe to do so!)
Now, as the UCM has to contend with an horrendous amount of AA in the game it has always seemed sensible to me to paint the undersides of their flying machines with a sky colour... in this case Vallejo VAL906 - Pale Blue
12. Just as we did with the topside however, just a single blue paint layer isn't enough to provide the definition and contrasts that we require. Thankfully on the underside of the miniatures we don't need to as rigorous applying both Wash and Filter. For this scheme I only use AK Interactive's Filter AK-071 Blue for Panzer Grey.
Again, apply the Filter liberally and once left to dry for an hour come back and using white spirits remove the excess to tidy up the surfaces.
Leave to dry overnight and then on the next day apply a layer of Varnish. The first Varnishing step is absolutely mission critical because without this layer of Varnish two things will happen. Your handling will rub off your Filters and Washes faster than you can imagine and if you were to apply any further acrylic paint (which we do a lot of here) it will bobble and collect together as the oils in the enamels repel the water based media.
13. At this point we have a model that is starting to look pretty good but I just wasn't happy with what I was seeing. The whole thing looked uniform but perhaps a little muddy and indistinct. I decided to outline all of the black and Buff Camouflage blocks... what a far reaching decision that was... I've been committed three times so far!
The outlining of the camouflage blocks provides a lot of definition to the disruptive came pattern and, well I just think it looks cool... which I guess is why Ive stuck with it!
To outline the black blocks I used Vallejo VAL992 Neutral Grey and for the Buff areas I used Vallejo VAL819 Iraqui Sand.
14. Finally we are coming up on the closing stages of the models. We now need to turn our attention to all of the parts of a model that draw your eye and give the illusion of something real shrunken down.
I dealt with all of the engines and exhausts first applying a layer of Vallejo VAL950 Matt Black mixed with a small amount of Games Workshop Chainmail paint to give a really dark metallic look which is then highlighted towards the edges with just Chainmail. I originally tried to use Games Workshop Copper on the Exhaust Ribs but I felt the effect was just too gaudy so I repainted them using Games Workshop Tinbitz which has been one of my favourite paints for as long as I can remember!
I also did a simple paint job on the canopy using very thin white lines over the black canopy glass, and a simple paint job of Red with White dot reflections on all of the guide lights that these military vehicles seem to be covered with! LOL
15. ...and so to the end. Its time for the decals.
There are no proprietary decals for UCM so a lot of these I had to make myself but it was a relatively simple process and the only ones that I had a problem with were the UCM banners that I did as the black didn't cure properly. The cockpit red warning triangles, Cockpit mascot logo and Banners were all made by me and the large numbers were purchased off of the Internet.
Unfortunately the UCM banners ended up only being able to be used as a painting guide.
To apply decals solidly a layer of Decal Sol is applied to the model first. The transfer is placed onto the model after soaking, positioned relatively quickly and after being left to dry for 5 minutes another layer of Decal Sol is applied to really bond it in place.
Once all of this is totally dry I go ahead and paint the UCM icon over the top of the crap decal... Im OK with the result, even if its not perfect...
The important thing here for me is that the decals and numbers provide a good aesthetic contrast with all of the randomness of the camouflage pattern.
The very last step is to provide a good layer of Matt Varnish over the whole miniature to protect it and Gloss Varnish over the Cockpit panes to give that glassy reflectivity that we all know and love!
Enfin!
...and here we can see the complete squadron of 3 Condors flying along next to each other.
Any thoughts and questions are welcome!!!