Tuesday 28 March 2017

Casting: The Black Brigade (Update)

OK ladies and gentlemen;

After three months work (quite literally!) I have finally finished sculpting, moulding and casting all of the 'must have' vehicles that I need to have for my Black Brigade... finally I can get back to painting!

So I thought I would give you guys a State of the World (of the Black Brigade) address so you can keep abreast of whats going on.

This is, as I have mentioned more than a few times previously, my first venture into casting so I whilst I was aiming for the best I was at least aware that the likely results would have unforeseen problems that I would have to address and overcome as I went.

Even using a vacuum chamber and pump air bubbles are a bitch that are a pain in the ass to resolve! Casting is actually prohibitively expensive, both in cost of materials and in the time that it takes to actually do. Principally because when you decide to do casting you cannot use the workspace for anything else concurrently because all of the bits and pieces that you need to use just kind of spreads. The cost of materials is surprisingly expensive, especially when talking about making the moulds. I had to use an entire months disposable income to purchase a 2kg kit and I've used about half of that already on these vehicles.

This isn't a project for the faint hearted...

Anyway, this is where I am with my Black Brigade at the moment:

The casting efforts to date
Just a quick view of all of my casting efforts to date. This image shows everything except a couple of misfires which I've kept around for use of parts.

2 full platoons of Vickers E type A and type B's
The thing that started this whole thing was a lack of decent sculpts of Vickers E tanks out there, this was the first vehicles sculpt I had ever done and I have to say, now that they are cast and ready to rock and roll, they must still be my favourites (with the possible exception of the C7P's)

You will notice that the machine gun turrets are metal, and that's because I couldn't be bothered to sculpt my own as I had so many spares laying around after making my 7TP jw platoons, I decided to use them as they were the same as the ones used on the Vickers E's in 1939. A convenient shortcut! 

...and these babies are pretty much bubble free!

C7P artillery and recovery tractors
Not strictly a vehicle that was used by the Black Brigade in 1939 they were however attached to the 121st Light Tank Company in 1938, and as I need to use them for other forces in my Polish army I thought I would post them here anyway. 

I doubt they will see much use BUT I'm so proud of my sculpting on this little baddass that I just couldn't pass an opportunity to show them off!

You can see that there are actually bubble cavities on these but they are small enough that they will be easily disguised and/or repaired by my reckoning.

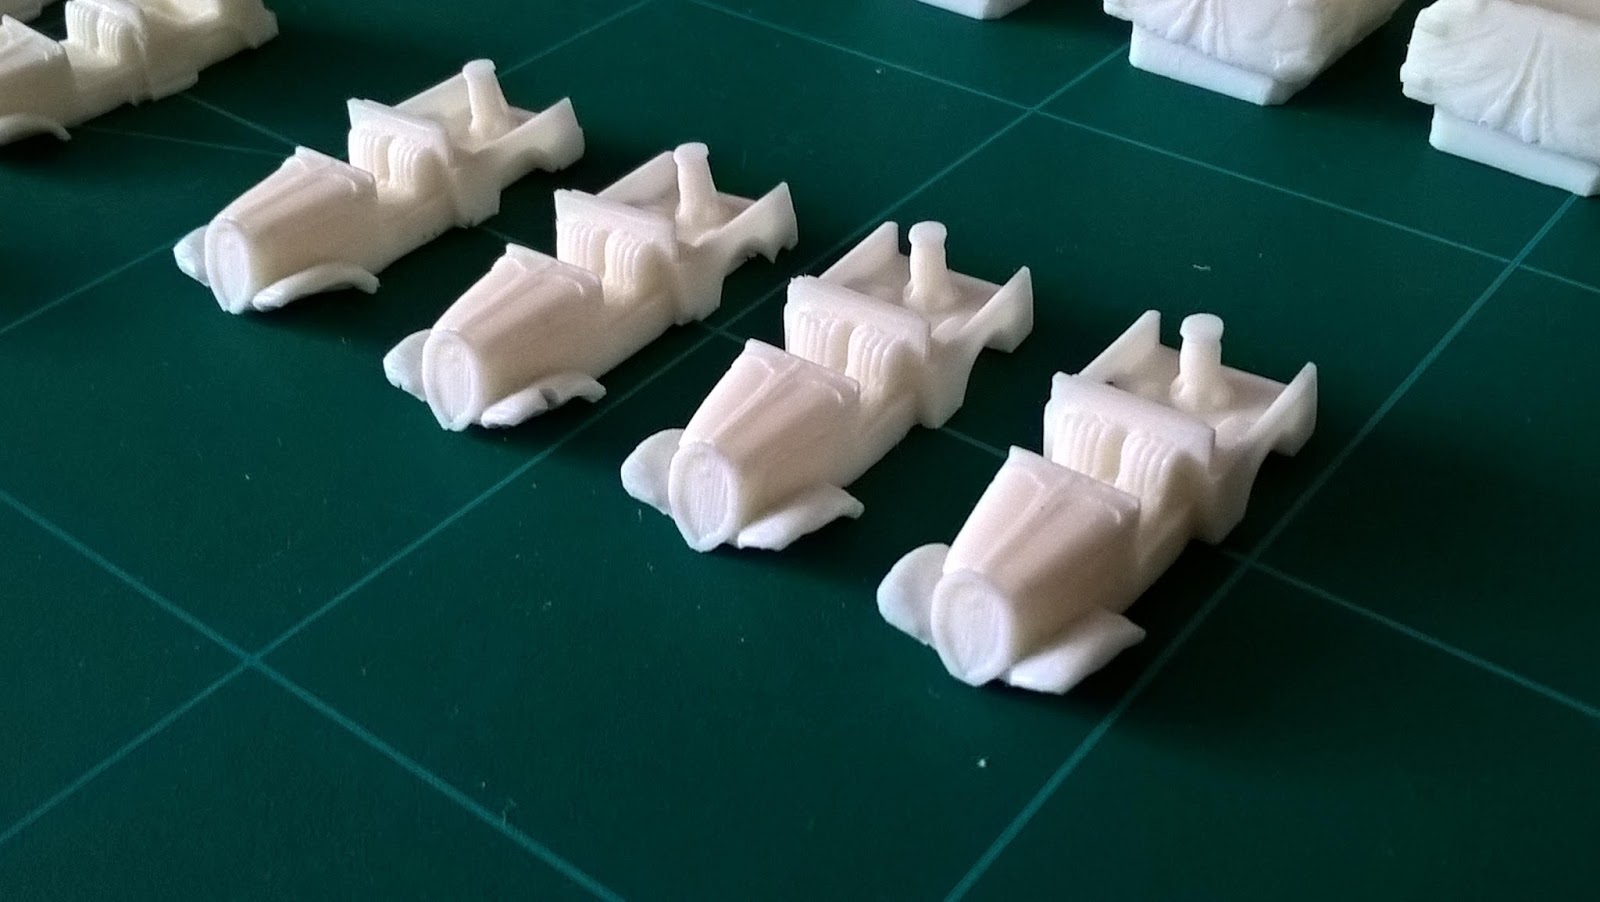
Polski Fiat 508 Lazik staff cars and Polski Fiat 508/518 Light Artillery Tractors
 Here we can see the bare bodies of the Polish staff car (which will also be used for my Piechoty Company and Anti Aircraft platoons) and the light artillery tractor that hauled the anti tank guns for the Brigade.

I really struggled  with all of the light vehicles as if I pulled them out too soon the vehicles would deform so badly I wouldnt be able to reform them, and on some of them if I left them to cure for too long the fenders would be so brittle that when I pulled them out they would snap so I would have to time it properly to pull them out of their moulds whilst the curing was still in the Green Phase but quite advanced so that the cast still had a little flexibility. 

On the whole its worked out quite well and what bubble cavities there are can easily be filled although on the artillery tractors the tread board that comes forward from the rear wheel arch is a consistent problem with the casting and may take a little more brain energy to fix

Polski Fiat 508 Tczankas
I'm quite pleased with the motorised Tczanka's that I've run off. The forward radiator grill isn't quite where it should be but on the whole, and considering the abject lack of of images and schematics available for design I think I've produced something quite convincing.

You can see that the third one along has a few more defects than the others so I would say that I'm likely to attempt casting up more until I can get more of the quality of the first in the row.

Polski Fiat 508 Furgon's
These light utility vehicles were used to ferry around the HMG platoons and such like so I couldn't get away with not having them. They were the last to be done and took the longest of the light trucks because of the enclosed cab which I had quite a bit of wrangling with to get right (ish) LOL.

The castings of these were completed quite early and so have a lot of the initial casting flaws so although I've got four on display here I'm currently running a few more off so that I can see if I can get casting quality up to the last one that was cast (the first in the row above).

I'm also pretty sure that I've got a bit of scale creep on these so I may have to go back to the drawing board and increase the size of the wheels very slightly... more on that later! 

Polski Fiat 621L's soft backs
If there is one thing that the Black Brigade fields in spades its trucks and half tracks. All of these (to the tune of at least 24) need to have soft backs as I am not a fan of seeing military trucks with nothing in the back!!!

I need so many of these that I think Ill be casting these up long after I've finished casting everything else! Thankfully the design is simple with very little undercutting that could lead to mould tear and the mould is quite well built anyway!

Light Truck Wheels
As you can see from the above image I anticipate needing a load of wheels for the light trucks and staff cars so I made a couple of different designs and just kept running them off. 

I'm likely to need more as air bubbles in these are really a pain in the ass BUT with the right amount of prodding and poking with cocktail sticks usually gets rid of the problem!

Pneumatic Tyres
The Polish Motorised Artillery Regiments had all of the wheels on their guns replaced from spoked wheels to giant pneumatic tyres and whilst I have enough metal ones for my Light battery of 75's the 100mm Howitzer battery needs a lot of conversion both to the tyres and the gun shield so I decided to cast up some options!

Windshield frames
With so many light trucks and staff cars now in my Polish army there is a constant need for windshields so I created some light and flat moulds which I could pour micro amounts of Polyurethane Resin into... and THIS is the reason why I bought the Fast Casts Resin that I did. Because its capable of curing in really REALLY thin sheets which resin usually cannot do as the curing process relies on internally generated heat from the chemical reaction.

No problem here though!

Staff Car seats
...and finally we come to the last element that needs to be independently cast; the front seats for the Polski Fiat 508 Lazik staff cars.

Not much to say about these really!

So there we have it. This is where I'm up to. I'm still casting up extras just to see if I can improve the quality of the models that I will actually use although I don't see me doing that for much longer as I only need a few now.

I also haven't included the 4TP and 10TP tanks here as they are both quite complicated moulds and I need a bit more time to get my head around how I will resolve the casting issues due to the complex undercutting and heavy details around the cannon barrels...

More on that later though. In the meantime:

FIX BAYONETS!!!!

(I wonder if that will ever be cliched?) 

Monday 27 March 2017

Casting: Casting the Miniatures

Finally we come to the actual casting of the miniatures. Everything has arrived. Nothing left to chance. I am finally in a position to start turning out the miniatures that will mean the difference between a Polish 10th Motorised Brigade comprising anything but the equipment that they actually used and a Polish 10th Motorised Brigade that is historically accurate portraying the gear that they were tooled with. All I had to do was take the plunge!
...
Just me and my tools! (You know what they say about bad workmen and their tools right?)

All the moulds are made and I was ready to rock and roll... and I just so happened to have a day off from my job which is taking altogether far too much time from my hobbies these days. I tucked in my bottom lip and struck out.

Now, I have read a LOT about casting and as such I felt that I was pretty well informed. I thought I would know how to overcome the problems before they occurred and bought into my own bullshit that I would be able to produce work of an outstanding quality

How wrong I was!.. but more on that later.

First thing that I decided to do was to lay out my work-space in such a way that I would have everything to hand quickly. 

When you are mixing polyurethane resin, the pot life (i.e how long it is usable in its mixing vessel) is only a couple of minutes long so you need to be quick. By a couple of minutes I mean that 2-3 minutes is considered standard. I opted to have a Long Part B which would give me a pot life of between 5-7 minutes. The is very misleading however. The pot life includes the time that its pourable consistency is akin to thick treacle which for what we are doing would prove useless.

The beginning consistency of the Polyurethane Resin that I've chosen (TOMPS Fast Cast Polyurethane Resin) is more like milk which is perfect for miniature casting because you can start by slush casting the inside of your mould, thereby ensuring that the resin touches and sticks to all of the undercuts and fine detailing on your miniature.

If the resin thickens too much this will become impossible and you will be left with gaping holes in your miniature when you extract it from your mould.

The first thing that I did was place my disposable cup onto my electronic scales and turn the scales on, which gives a beginning reading of 0g


The set up of the casting workspace. Moulds to the left, resin at top and mixing pot and scales in the middle... complete with disposable chopstick stirring rod.
Its a well known fact that Polyurethane Resin is sensitive to its mixing ratios which if you get it wrong can lead to vehicles that either never cure or sweat once cured. Neither of which is a result that you want. When I received my Polyurethane Resin Part A and Part B I was quick to notice that there seemed to be a lot more of Part B than there was of Part A and this is because the instructions for use are very specific about using a 1:1 ratio of Part A to Part B by weight... which is why I have electronic scales in the picture. 

34g of Part B in the disposable mixing container.
When I first started I decided on mixing up a big batch that I would use for all of my moulds and duly when about measuring a large amount (about 70g worth) of Polyurethane Resin by adding Part A to Part B which was already in the cup. I proceeded to give it a thorough stir and it was indeed the consistency of milk which I was happy about. Then it went into the degasser to degas it.

Pointless exercise! The milky consistency means that air bubbles are not generally caught in the cup so this was effectively wasted time.

However after about 30 seconds in the degasser I whipped it out and started to pour it into my moulds quickly. Once full the moulds were put back into the degasser so that it could do its work on the rapidly thickening resin.

A very bad picture of the moulds being degassed. Lots of net curtain reflections :D

This was worth the time! There were bags of air bubbles being pulled out of the mould and after a couple of minutes I pulled out the moulds from the Vacuum Chamber and left them to cure on the desk.

The first moulds sitting on the desk waiting for the resin to cure.
The demould time for this resin is supposed to be 30 minutes. Bear in mind however that the smaller and thinner the piece to be removed from the mould the longer that the curing process will take. This is something that I had failed to take into consideration... to my cost!

After a half hour or so had elapsed I started to remove the castings from their moulds. The largest of the moulded vehicles were solid enough, although if pressed and twisted hard enough would deform. This is called being in the Green Stage which is where a casting is solid but still retains some slight flexibility. With vehicles that have intricate parts such as fenders and like this flexibility post demoulding becomes extremely valuable as you are able to move things around slightly.

The smaller vehicles such as the Polski Fiat 508's were still far too soft to be removed and so had to be reput back into shape and left. As it happens, with the correct mixing of the Polyurethane Resin these smaller vehicles take about an hour to cure hard enough to remove from the moulds without being destroyed. At about an hour the vehicles are still in their Green Stage so retain some limited flexibility.

The first vehicles being released from their moulds
Now, it has to be said that on removing the vehicles from their moulds I was mighty pleased with what I had achieved, and that pleasure over rode all of the flaws which jump out at you. It turns out that despite having a de-gasser there are things that I must have not done effectively enough because as you can see from examining the C7P and the Polski Fiat 508 Furgon there are small cavities all over the miniature meaning that there were air bubbles trapped all over the place

My first C7P  still on its resin funnel which needs to be cut away, and showing all of the cavities.
The first C7P had its flaws. There were plenty of cavities all over it BUT the issues were small enough and localised enough (predominantly in the area of the tracks) that I am rather of the belief that most of them can be fixed with putty filler and failing that when painting I can weather the vehicle and plaster it with MIG's mud to disguise the casting errors. 

The first Polski Fiat 508 Furgon showing the fender cavities

Another view of the Furgon from above showing the fender cavities
I've spent the whole day casting now and I've had plenty of opportunity to try different things to see what works and what doesn't.

I have to say that I feel that I have it nailed now. The vehicles no longer have any air bubble cavities, cure well and look good.

I decided soon after my first attempt that I would need to mix up smaller amounts of Polyurethane Resin and pour just into one or two moulds at a time. This meant that I would be able to make use of the milky consistency of the resin to get into all of the mould details and wouldn't have to wrestle with a rapidly thickening sludge!

I no longer pour the mould full straight away. There are parts of each mould where air collects and in order to get rid of these air bubbles I only initially put a small amount of resin in and massage the resin into the mould extremities by twisting and turning, pushing and pulling the mould. This isn't fool proof but it does make a massive difference. This is especially useful when doing stuff like turrets and you need to get the resin down the gun barrels.

Once the resin has invaded all nooks and crannies I will then pour the mould full and place into the vacuum chamber and switch the pump on. I make sure that I leave it a good while now on. I don't mind the resin curing inside the chamber for as long as its in there unless there are a mass of air bubbles that are pulling the resin over the lip of the mould. In this instance I keep thumbing the air tap on the vacuum pump on and off to tease the air out.

Again this isn't fool proof but the vacuum pump does 90% of the work, with me providing a bit of manual vibration giving the last 10%!

...

And this ladies is the quality of what I am getting now:

A brand spanking new Vickers E tank. No defects, no air bubbles... just lots of Polish goodness! 

This is a casting of a Vickers E that I have done towards the end of my current learning curve. There are no air bubbles on the casting and the detailing is accurate and high, Now I just need to do another 9 of these!

I'll do an update post when I have cast all of the resin vehicles for the Black Brigade so that you can see whats going on OK?

Whats that?

Fix BAYONETS!!!!!


Thursday 23 March 2017

Casting: Making the mould

Well I promised you guys that I would walk you through my learning process as I attempt casting models to a level of quality that I would be proud to sell to my fellow modellers and gamers.

Nothing professional here, but more a desire to have decent looking models as opposed to whats out there and available for the Black Brigade. 

So we have already had a look at the gear list that I have had to put together in order to be able to start knocking out all of this stuff that I need. Its now time to start using it.

First stop was the vacuum pump, and I have to say that this was a real ball ache.

The Vacuum Pump

The Pump that I bought must have been an end of line piece of gear as they don't manufacture it any more and it is absolutely impossible to find instructions on how to use it online. All I have is a German language instruction booklet that was produced in China and was delivered with it!

Thankfully my significant other is fluent in German

Any excuse to get some exposure! She made me do it!!! :D
However, the diagrams do not point out vital elements on the schematics and the German descriptions turn out to have a generous spattering of Polish in them as well.

Poor show!

After wrestling with it for an hour or so I FINALLY worked out where to put the oil into... and had to spend an hour and a half pouring oil into it! I ended up resorting to a micro funnel with a cocktail stick stuck down the middle of it to get the oil into the pump without air bubbles causing constant spillage! 

WHAT A BITCH!!!! No wonder they don't make it any longer! Incidentally all of the other ones that you see now online all have Oil Intake Ports on the top of the pump so my problem will no longer be anybody elses!

After testing the pump to make sure it did what it says on the tin (so to speak) the next step was to prepare the prototype for making a mould around it.

I've chosen to do the soft back for the Polski Fiat 621 truck. The reason for this choice is that its a simple exercise in learning a process. Very little undercutting and not much surface detail that isn't bass relief. Should be something easy to pull off... and as I need so many of them anyway I thought it would be a good place to start.

This process is called Drop Moulding and is probably the most simple of Moulding processes. Simply put you just drop liquid Silicon over the prototype in order to create the mould. 

The very first thing that needs to be done is to measure up a base board and trial fit a Lego retaining wall to the board which will create the receptacle for pouring the silicon into which will actually create the mould.

Once the board is measured up cut it with a healthy border surrounding the Lego.  Its important that the mould base board can fit inside the Vacuum cylinder otherwise you wont be able to degas the mould.


Once everything is measured up the first thing to do is to glue the Lego bricks to the base board so that there is no chance of any of the Silicon bleeding through under them and ruining the mould. To make it easier for the Glue Gun to reach the bottom of the bricks only use two layers of bricks initially.


The next step is to but a Blue Tack 'funnel' onto the bottom of the piece to be moulded. This Blue Tack fills three functions. Firstly, it creates a tight seal of the item to its baseboard so the mould integrity is not compromised by creating flashes and invasions of silicon where you do not want them to be. Secondly this Blue Tack actually creates the 'funnel' through which you will ultimately pour your resin when you are casting new copies. Thirdly this 'funnel' creates a receptacle for extra polyurethane resin which, when you degas each new casting, will provide enough extra resin to ensure a perfect casting when the elimination of the gas bubbles within the casting depletes the extra resin as it takes the place of the bubbles. 


Depending on the viscosity of the resin this may be a negligible amount BUT personally I would rather have more than not enough to cover this possibility.

The next thing to do is to press this Blue Tack funnel to the Moulding Base Board to ensure that there is a tight seal all the way around to prevent silicon leakage.


The final step in the preparation of the mould is to build up the Lego retaining wall to a level that is higher than the piece to be moulded ensuring that it is high enough that the mould will have a solid and sturdy base once the silicon is cured.


...and there you have it. The Mould is now ready for its silicon to be poured in.

... and that's where everything became touch and go!

So having finally received my two giant syringes (which I believe in a former life may have been used to impregnate Diplodocus' in Jurassic Park!) I allocated one syringe for the Catalyst and one for the base of the Silicon. So long as they are only used on what they are labelled for the liquid will never cure and so the syringes will be reusable.

Now this silicon is supposed to be extremely fluid, which is the main reason that I bought it BUT when I drew it up into the syringes (same for both parts) it was as liquid as Golden Treacle! That's thicker than Maple Syrup to all of you Yankees and Cannucks out there ;) This worried me a bit as with all of the undercuts on these models I thought that this may present a serious problem as I attempted to make these moulds.

I drew up 80ml of each of the two liquids and deposited them into a mixing pot. This Silicon is addition cured which means, amongst other things, that you can measure it by either weight or volume so long as its a 1:1 mix. Happy days! I gave it a good stir in its mixing pot and then put it into my vacuum chamber to be degassed. Thankfully as I stirred it around it also became more fluid as well so it may not come with the casting issues that I was stressing about.

Now, this is the first time I have ever used a vacuum pump in anger so the results were perhaps predictable. I sealed the chamber and switched on the pump...then sat there watching the pretty air bubbles rising to the surface of the silicon. I bled the air out periodically and then when I decided I had done enough degassing I did a final opening of the air valve... unfortunately I opened it immediately and completely not knowing that it would also bleed air into the cylinder straight down into the silicon... which exploded all over the vacuum cylinder! Doh!!!

Silicon Explosion after catastrophic re-gas!

Thankfully I had made enough to still complete my task so I took it out and poured it into the mould wall containing the prototype. Still pretty viscous but I angled the mould and poured slowly into the bottom corner allowing the silicon level to rise under the undercuts of the prototype levelling the mould to the horizontal only when the silicon was in danger of spilling over the top.

Mould after the initial pour and before degassing.
Once the mould was filled I could see that there were an incredible amount of air bubbles still in the silicon so I decided to put the whole mould into the vacuum chamber.

This time instead of degassing and re-gassing cyclically I decided to leave the pump on for a good thirty seconds or so until all of the air bubbles had been drawn to the surface only bleeding air into the chamber slowly and only when it looked like the silicon would pour over the surface of the bricks.

Degassing the mould. You can see the remains of the silicon explosion to the right.
When I finished degassing I took the mould out and noticed that the majority of the air bubbles (of which there were millions!) that were left were laying on and just under the surface of the mould and so wouldn't affect the integrity of the mould detailing so I was happy about this at least.

I also realised that I probably had enough silicon left in the pot to do another small mould and so I knocked up a mould for my Polski Fiat 508 Lazik Staff Car as well, and went through the same process with one exception. I stopped feathering the gas tap and just let the chamber do its work for longer periods. The results were much MUCH better!

Both moulds being left to cure after degassing.
Something else that became obvious after I sat there watching the moulds cure was that despite the silicon being extremely viscous the air bubbles that are initially trapped in it will still slowly rise to the surface and burst. I wouldn't want to bet my mould detail integrity on this though because any excuse at all to trap an air bubble will be taken I think BUT it is a help.

The state of the moulds after an hour.
Looking at the photo above we can see that whilst the initial mould still has plenty of gas bubbles the smaller of two moulds, the second mould has almost none, and those bubbles that are there are all tiny and near the surface.

On the silicon tins it says that the de-mould time is 2.5 - 3 hours although I will probably play it safe and just leave the moulds until tomorrow before I remove them.

...

Well after three hours the silicon was nowhere near cured, in fact it was only just reaching the 'tacky' stage. This did cause me some concern as I left for work wondering whether or not the moulds would cure at all.

Flash forwards to 6am and I arrive back home to find some beautifully cured moulds with absolutely no air bubbles inside the silicon at all.

The two finished and cured moulds, labelled, with the prototypes next to them
The prototypes were surprisingly easy to release from the mould. Looking inside the mould I couldn't find any evidence of air bubbles spoiling any of the detail either so I can say at this point that I would consider this to be a successful first venture into the heady world of casting miniatures.

A look at the detail inside of the mould
So, the next thing to do would be the actual casting of these miniatures BUT instead of that I'm going to spend a couple of days making all of the moulds that I will need for all of the vehicles that I'm going to be casting up so that if I am over ambitious with the amount of resin I'm mixing up I will have extra moulds in which I can pour it so that it doesn't go to waste.

I'll do another blog on the actual casting of the products soon but for now...

Lessons and Observations

i) When using the vacuum pump don't keep removing and adding gas into the chamber. Switch it on and leave it on to allow it to do its work, only adding gas back into the chamber IF the silicon looks like it will flood over the top of the mould retaining wall.
ii) The Lego retaining walls should be twice the height of the pour level of the silicon if degassing is to be attempted to prevent the silicon flooding over the top of the walls.
iii) Even though the retaining walls are glued to the base and the bricks fit tightly against each other the vacuum chamber will pull silicon through the joints between bricks and base. It isn't a problem as its such a small amount but it does still happen. This is one of the reasons why you still need your border around the wall.

Now, when all is said and done... FIX BAYONETS!!!!


Wednesday 15 March 2017

Casting: The Kit List!

...and so, after three trying months of sculpting an all together far too small a pile of Polish vehicles we come at last to the most testing of sequences in a chain of events that will ultimately lead me to being able to field the Polish 10th Motorised Cavalry Brigade; The Black Brigade in my Flames of War games... the actual mold making and casting of all of these lovely little vehicles that nobody competently makes!

So, as Im going to talk you all through my trials and tribulations that I suffer I thought it may be a good idea to provide a kit list that I have put together and explain my choices... kind of setting off on the right foot so to speak...

The Kit! (so far)

Well I guess the first thing that I would have to say is that if you are the kind of ne'er say die daredevil that wants to embark on a cast-up-your-own-miniatures mini adventure (car not included!) then you should really take stock of things because this is in fact no mini adventure at all... and not cheap either!

Check out the picture above and you will see all of the gear that I have decided is necessary to do this. It even looks like its a kick in the financial happy sacks!

However, when all is said and done I anticipate that there will be a certain gloating pleasure in completing my aims this year! :D

Fortunately where this is all concerned I had a leg up in 2015 when a Chinese manufacturer screwed up a piece of film equipment that I had ordered and I was left with a nice sum in the bank wondering what to do with it. I decided to purchase a vacuum pump from an Ebay supplier which spent a year in mothballs while I finished up other project.

The Vacuum Pump - £220

The Vacuum Pump kit

Now these things are not generally cheap BUT this particular ebay supplier (http://www.ebay.co.uk/usr/trevoralandixon2010) has been putting these kits together and selling them for quite a while at very reasonable costs. I chose a kit that had the largest vacuum cylinder that I could find as I have a French Indochina 'Dinassaut' project hoving into view next year and these are items I am intending to sell so I need a cylinder that can fit the molds for the boats.

Why use a vacuum pump? Well there are two reasons actually. 

Firstly when you are mixing up your silicon rubber ready for the mold to be made air bubbles will become trapped in the mixture due to its high viscosity. On drying some of these air bubbles will lay against the sides of your product leading to resin bubbles becoming a part of your final piece... and believe me, I know from previous experience of buying somebody elses attempts that it takes a LOT of work to disguise these errors. Its easier just to eliminate them straight from the get go. Before you pour your silicon over the prototype stick the mixture into the vacuum chamber to extract the air from it... then pour!

Secondly if anybody has done any home casting before, one of the probable flaws in your produce will be all of the resin holes and cavities that plague your vehicles. This is an inherent problem with drop casting and is caused by bubbles of air being trapped against the sides and undercuts of the things you are trying to make. Removing the air from a casting environment reduces the size of these cavities to almost negligible sizes. Placing new casts into a vacuum pump improves the quality dramatically. The higher the viscosity of your resin, then the greater the improvement in quality of the final cast.

The Silicone Rubber - £81.95 (2kg Kit including Taxes and Shipping)


Make no mistake. Casting is expensive. A 2kg kit is deceptively small due to the weight of the component parts and the Silicon is the most expensive part of the casting materials (the vacuum pump not included of course). It is however an unavoidable expense depending the scale of the operation you want to run with.

There are two main types of Silicon Rubbers to be considered and that it Addition Cured and Condensation Cured. Each will give you a silicon rubber mold but achieve them in different ways both of which however are classified as Room Temperature Vulcanisation (it creates its own heat internally through chemical reaction).

There are a bewildering array of Silicon Rubbers on the market which we can use, for a vast range of techniques but for me I only envisage a single operational method, and thats dropcasting small scale military vehicles. With that in mind the two post important elements that I thought I needed to study up on are its elasticity and its durability.

After reading around the subject for quite a while I came across TOMPS Addition Cure RTV Silicon Rubber Viscolo 13. Its actually another organisations product but one which TOMPS have rebranded as their own and the 13 relates to its position on the Shore A hardness scale... meaning its soft! Damn soft! Owing to the degree of detail and undercutting I will likely need to take into consideration (mainly because of my tanks... look no further than my 10TP) this silicon rubber compound is widely lauded as resisting Polyurethane resins (used for the actual casting) better than any other and outlasts all condensation cured silicons and many, if not all addition cured silicon rubbers. Nice!

Testing has indicated that the molds can sustain up to three times more 'pulls' than other silicon rubbers, can usually be used without a mold release substance and can stand a far higher degree of deformation returning to its original shape...

To me this one seemed like a winner! Not the cheapest but certainly sounded like the most forgiving for what I am aiming to do. 

When I start complex projects I dont like to cut corners  because it creates bad habits. I like to get it right the first time, where possible. By buying this option I was hoping that I would achieve this!

The Polyurethane Resin - £37.04 (including Taxes and Shipping - bought off of ebay.uk)


If you get your mold making practises correct then the next big hurdle is actually the casting of the miniatures themselves.

Just as there is with the Silicon Rubbers there is also a vast array of resins to choose from. Polyester resins are the cheaper option but for relative values where casting toy vehicles is concerned then you shouldn't really look any further afield than your Polyurethane Resins.

Polyurethan Resin is easy to use and because of this it is a popular choice for anybody venturing into home casting and craft uses. It is usually opaque when cured and sets quickly with a 'pot life' of between 3-15 minutes and ready to demould after about 30 minutes. Its usually mixed by volume which means its an easier option than those mixed by weight (due to different Specific Mass' of parts A and parts B for some choices). Its proven to be less brittle than Polyester Resins and easier to work with once cured. Perhaps the greatest benefit to us model makers is that the viscosity available is much MUCH lower with Polyurethane Resins which means you can do slush casting easier and make sure that none of the tiny detailed areas get missed.

The TOMPS Fast Cast Polyurethane Resin that I chose is specially formulated to cure in thin sections of less than 1mm which other resins would struggle massively with due to the requirement for chemically driven heat in the curing process...

This resin is, believe it or not, one of the cheapest out there, which I think beggars belief when you understand the qualities that it brings to the table (so to speak). It has an uber viscosity of around 40-50cps which means essentially that when first mixed it has the consistency of milk... there is no detail that this will miss! It has a pot life of 3 to 4 minutes so you need to be quick BUT with a consistency of milk the need to degass before pouring should be unnecessary. We will see about this. Best of all perhaps is that, once cured, it has a hardness rating of Shore D 72... which means its transformed into granite! Its hardness rating that ice climbing boots soles are rated to. 

This is one attractive product!

The Release Agent - £20.99 (ordered off of ebay.uk)


When creating molds or casting from pre-existing molds it can sometimes be an advantage to make extraction of prototypes or new casts possible. Technically it shouldn't be necessary with the products that I am using but I decided that it is better to be safe than sorry and decided that a Release Agent would be better to hand than not having it at all and so it made my list!

Mold Containment Walls - £19.87 (including taxes and shipping. Ordered from ebay.uk)


When creating your molds you need to use a material to create the walls within which the molds will be poured. If using a really soft silicon rubber it will also help to have the retaining walls in place to prevent mold deformation if you aren't flush with your silicon (use a lot of it to create really wide molds). I opted to go for lego as it means I am able to create molds of differing sizes and shapes.

Scaled Mixing Pots - £11.68 (including taxes and shipping. Bought from Ebay.uk)


Mixing silicon rubbers require scaled measuring beakers which can be cleaned afterwards and then reused. I bought a large one as well so that I can degass the silicon mixture before pouring as well. Leftover silicon can be left to cure in these beakers and then easily peeled off.


Hot Glue Gun - £10.99 (including taxes and shipping. Bought from Ebay.uk)


The Mold Retaining Walls need to be fixed securely to the Casting Baseboards in such a way that leakage under the Mold Retaining Walls. This can be done by using a Hot Glue Gun to seal on the inside of the wall edge that lines the Baseboard. Nice and cheap as well!

Casting Baseboards - £6.05 (including taxes and shipping. Bought from Ebay.uk)


Baseboards are what your molds will actually be made on. You need to have a very healthy border around the mold retaining walls and they need to be durable as you are likely to use them over again. I chose MDF boards that I ordered off of Ebay.

Disposable Mixing Cups - £2.42 (including taxes and shipping. Bought from Ebay.uk)


Whereas the Silicon Rubber thats mixed up can be easily peeled off, the Polyurethan Resin that is mixed up and cured cannot. Once cured the mixing pot is essentially unusable and therefore needs to be discarded. The cheapest option out there is the disposable plastic cups which can be picked up off of ebay at a VERY reasonable price!

Electronic Kitchen Scales - £6.89 (including taxes and shipping. Bought from Ebay.uk) 


Absolutely vital to have due to the necessity to mixing the Polyurethane Resin by weight as opposed to volume due to the differing Specific Masses of the parts A and parts B that need to be mixed up and the requirement of accuracy that mixing these parts requires if a good outcome is to be expected. 

Disposable Graduated Pipettes - £3.25 (including taxes and shipping. Bought from Ebay.uk) 


Disposable plastic pipettes may be required whenever you want to mix up small volumes of Polyurethane Resins and they can be found on ebay at very reasonable prices.

Paintbrushes - £2.29 (including taxes and shipping. Bought from Ebay.uk) 


Two reasons to by brushes! Firstly any spilled Silicon Rubber can be cleaned up using white spirits on your brushes and secondly when making moulds that require a LOT of detail it can sometimes be advisable to paint the silicon rubber onto the prototype using brushes to create what is called a 'Detail Coat'. This can guarantee that none of those fine details are missed!

Mixing Spatulas - £2.95 (including taxes and shipping. Bought from Ebay.uk) 


When mixing your parts of the silicon rubber (and your PU Resin) thorough mixing is an absolute necessity so having decent mixing spatulas is advisable. With your Silicon Rubber these can be reused so decent spatulas are advisable!

White Spirits - £3.50 (including taxes and shipping. Bought from Ebay.uk) 


White spirits should be considered a necessity when embarking on casting due to the fact that the materials that you are using can be cleaned up using white spirits... and you can use it to clean the brushes that are being used on your detail coat!

there are few more bits that I've ordered to add to my kit list that I havent received yet and  which I already own but forgot to add to the photos which are:

A spirit level to make sure that the molds are curing flat.

A pouring funnel to make sure I can get my Pump Oil into the Vacuum Pump without flooding my work space

Giant Disposable Syringes so that I can draw enough of the Parts A and B for the Silicon Rubber to cure properly.

So there we have it guys, a complete kit list! Now lets see if I can actually use it without the need for summoning Great Britain's emergency services!

Nothing more to say on this other than...

Fix Bayonets!