Its time for the next chapter in our Slovakian Odyssey and this time we will turn our attention to one of their heavy anti aircraft guns; the 8.35cm KPL vz.22 (KPL standing for kanon proti letadlum).

Now, its a funny thing but this gun seems to have fallen well into obscurity and only really known about by weapon aficionados or else those nutters who have an interest in the Czechoslovakian or Slovakian militaries of the interbellum or the start of WW2.
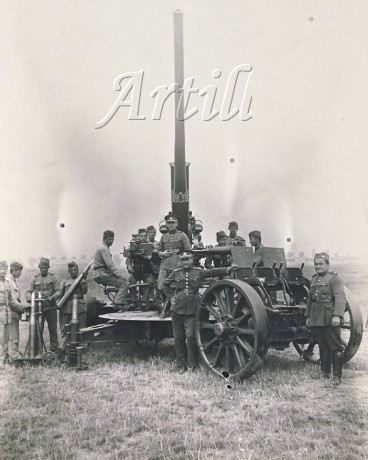
In the Interbellum the Czechoslovakian army was widely regarded as one of the best equipped and trained in Europe, and rightly so. Considerable credit for this preparedness must go to this gun; the 8.35cm vz.22 which formed the core of the army's anti-aircraft batteries.
This anti-aircraft gun has long been regarded as one of the most successful anti-aircraft guns in history and has earned the plaudit of being the best anti-aircraft gun of the '20's.
At the start of the twenties the situation with regards to anti-aircraft defence for the Czech army was not exactly rosy. All that they had for the entire country was four of the vz.5/8's and another twenty newer 12/20's. Not exactly going to set the world alight!

These weapons were only suitable for use from static, prepared positions alongside the light machine guns carried around by the troops themselves.
The army's High Command recognised the precarious nature of this lack of aerial defence and the likely results of not keeping apace with the fast developing air fleets of its hostile neighbours... happily it turned out that the countries largest arms developer, Skoda and its Pilsen facilities were also acutely aware of this shortcoming.
A focus on the development of new anti-aircraft weaponry was instigated soon after the end of the First World War in which Skoda used the expertise that it had gained in anti-aircraft weapon development for the Austrian army and navy.

By 1919 7.65cm and 8.35cm calibre projects were already started from which came the first generation anti-aircraft guns; the vz.18/19 which immediately scored successes on the export markets.
A test battery of four cannons were exported to Sweden in 1921 with a further 16 being delivered to Spain in 1923 and one being delivered to France for testing as well. The vz.18/19's were modern and effective weapons but transport proved to be a serious handicap for them.
In the wake of the First World War there was little other affordable option than horse traction to pull artillery weaponry. Motorised tractors did exist but at this point in time were prohibitively expensive. Because of this horse traction was the only option that was really considered. However a six horse traction team effectively limited the pull weight to 2800kg if the weapon was to be kept in motion which resulted in a focus on smaller calibre weaponry with lighter ammunition.
When the Ministry of Defence turned its attention to the provision of anti-aircraft artillery in 1919 the attention of the project's artillery experts zeroed in on the 8.35cm project. When the ministry rejected the 7.65cm model the 8.35cm was quickly tailored for use with the army.
The new design proved extremely promising. Equipped with a 10kg shell it achieved an exit velocity of 800m/s and achieved a ceiling of 11,000m. Despite these initial achievements however the Ministry of Defence set a requirement that the weapon be made mobile due to its perceived deployment in the field as a mobile anti-aircraft asset.

Because the weight of the weapon itself exceeded the weight that was possible for hippo-traction the Ministry approved the weapon for motor-traction which was considered a cutting edge risk at the time. Unfortunately, owing to the requirement for a lightning fast response time to enemy aircraft presence over the battlefield when with the army it was decided that the weapon would need to have the ability to be fired directly from its transport platform. This issue was successfully negotiated but it meant that the entire chassis for the weapon became prohibitively heavy which adversely affected its overall mobility.
The chassis of the weapon by necessity became very heavy due to the increased strain placed on it through continual firing from the platform itself. This weight proved limiting to its speed of march and resulted in the assignment of heavy artillery tractors to the batteries.

Weapons testing took place between 1920-1922 with the Ministry of Defence and the General Staff going back and forwards with Skoda as the final format of the weapon was sought. For example in 1921 the Ministry of Defence wanted a version of the weapon that could be broken down into three loads for use in mountainous terrain. This was one of the research avenues that was not followed up on.
Much investigative and manufacturing work was completed on the chassis to carry the gun with intensive testing conducted on its performance after repeated firing and hauling over long distances. The experience gained in using the vz.12/20's and firing with the new types of ammunition was put to valuable use at this stage.
In 1922 the final version's prototype was presented to the Ministry of Defence for testing by the army and because it performed so well was put into immediate production and introduction to the armed forces under the formal designation of 8.35cm KPL vz.22. Work on the new ammunition was not completed until 1923 however and when finalised the army received it under the designation OCGN vz.23.

Full serial production for the gun was achieved in 1923 with the first 14 weapons being handed over to the army for incorporation into the anti-aircraft batteries. The next year 35 weapons were delivered. There was then a downturn in supply with the technical arms office in Pilsen only taking receipt of six weapons and a handful of spares over the next three years. Even through these years though Skoda was not idle and conducted intensive auto-frettage testing of the weapon components to increase their service life.
Auto-frettage of components is when they are subjected once or repeatedly to an internal overpressure, the size of which is chosen such that the material in the most stressed areas, i.e on the inside of the component and in adjacent faces is 'plastically deformed'. When unloading the stress the plastically deformed region of the material prevents the 'elastically deformed' rest of the component from returning to its original shape and/or size. This results in pressure stresses on the inside of the component and tensile stresses on the outside of the component inevitably leading to early failure.

If the component is cyclically loaded with internal overpressure in operation the most heavily loaded area is again the inner surface of the component and the adjacent faces. The auto-friction-induced pressure stresses that act here reduce the magnitude of the cyclic tensile stress, thereby extending the crack initiation time. Pressure stresses also slow the crack growth and in some cases even cause a complete stop. The tensile stresses on the outside of the component generally do not, due to their size, significantly affect the life of the component.
The parts can be made of materials that are capable of macroplastic deformation, in which the yield strength does not significantly depend on the direction of the previous load and which exhibit residual stress stability.
This method of production was used for the remaining production run of these guns with the first ones using the auto-frettage method of production running off the line in 1930. The majority of the guns were produced in 1931 when the army took possession of another 45 pieces.
In total the army ordered 144 anti aircraft guns of 8.35cm calibre with the entire delivery run being completed by 1933.

It was recognised as the best anti-aircraft in the world for a long period of time and Skoda had many export requests but the military resisted this strongly and when the Pilsen armoury finally forced the government to intercede it resulted in an economic crisis and all of the potential buyers dropped away for economic reasons. From the export batch several pieces did actually reach friendly Yugoslavia and two reached Estonia but all others remained in Czechoslovakia.
The price of a complete gun was set at 586,000 CZK with a whole battery being offered at 2,346,948 CZK which was an exceptionally high cost for the day but the benefits of the system were easily recognised justifying the costs.

When these guns were first delivered to the field armies it was finally possible to totally reorganise the three existing anti-aircraft units into regiments 151, 152 and 153 (this one will become important to all lovers of the Slovak army), each comprising three sections. From this time it became possible for the armed forces to start testing out the modern processes of anti-aircraft defence by putting all of the tools and machinery of fire control through intensive field testing. This applied most especially to the sights of the weapons themselves and the skills of the crews serving the weapons.
For daytime firing the DR-III sights were used, whilst nighttime shooting was conducted alongside the vz.28 searchglight lamps. A central fire control system was also engineered along with sound location of targets. The entire trial and error process of all of the elements and systems finally led to the creation of an extremely effective fire control methodology in the early 1930's with Czechoslovak anti-aircraft processes standing at the global forefront.

As the international situation began to deteriorate in the '30's the perceived importance of the role fulfilled by the anti-aircraft artillery increased as well. Efforts to modernise and improve the operational and tactical effectiveness of the batteries was already evident by 1933 with the conversion of one artillery regiment into Anti-Aircraft Artillery Regiment 154 and the increased delivery rate of the vz.22 which now became the backbone of the Czech anti-aircraft formations until the fateful days of 1938 by which time the dramatic developments in aircraft, and the deployment difficulties experienced when using these batteries made the necessity of a modernisation program for these weapons again necessary. Above all was the lack of a semi-automatic function on the guns which would have radically accelerated their rate of fire up from its existing 12 rpm.

A major impact on modern anti-aircraft artillery design was the ability for coordinated indirect battery fire using central sighting data which was eventually incorporated into the batteries armaments registers as the vz.37 Sight. Under pressure of the climate and local circumstances, and due to extreme costs this measure was temporarily abandoned.
Despite newer models of anti-aircraft artillery coming into service from 1937 at the time of the Munich crisis the vz.22 was still the backbone of the Czech anti-aircraft artillery available. In the 1938 mobilisation, just around the territory of Prague there were fourteen batteries of four guns, accompanied with searchlights and heavy machine guns as well as many other batteries spread around the country.
The increasing importance to anti-aircraft defences that was being placed by politicians and professional soldiers is evidenced here by the fact that after the demobilisation after the Munich crisis the anti-aircraft assets were the only branch of the Czech armed services that was not decreased in size but on the contrary were reorganised and increased in size.
After the German occupation of Czechoslovakia the Germans forcibly took control of 119 vz.22's with a further 72 reserves whilst the remaining 25 in Anti-Aircraft Artillery Regiment 153 stationed in Bratislava were taken by the newly created Slovakian state.
Whilst the German use is another story not to be explored here we will look at the Slovak story.

AAR153 in Bratislava comprised 24 guns in six batteries of four with one gun spare. It also had a provision of a single battery of four antiquated 8cm vz,5/8's. By the end of 1939 the large calibre anti-aircraft machine gun companies with about 60 2cm Oerlikon's had also been rolled into the organisational structure of AAAR153
In 1940 the AAAR 153 changed its name formally to the Regiment of Anti-Aircraft Artillery and divided into three territorial Battalions (I, II & III) as well as additional army units. The only anti-aircraft batteries allocated for army use at this time were the 4th Light Battery (with 1st Division), the 14th Light Battery (with 2nd Division) and 15th Light Battery attached to the army headquarters.

In March 1941 (note this is a couple of months before the invasion of the Soviet Union) the Slovak army received its first four gun battery of Krupp 8.8cm vz.38 guns, the famous Eighty-Eights! which went to the 8th Heavy Battery in Bratislava.
In July 1941 the regiment was reorganised once again, this time into six Battalions assigned to Territorial Defence and having absorbed a handful of 6-ST6-L trucks from the abolished AR51/II
The 8.35cm vz.22's were used for Territorial Defence only up to 1944 although in gradually diminishing numbers as they were gradually replaced with the better German weapons.

It is worth noting at this point that up to 1941 NO heavy batteries accompanied the Slovak field armies (or divisions as the case may be) and even in August 1941 when the Mobile Division was formed only the 8th Heavy Battery with its 88's was assigned to it. These 88's were originally towed by the Praga T-9 tractors that were designed for the task but due to mechanical problems these were quickly withdrawn from use and replaced with the heavy trucks from the abolished AR51 which still proved inadequate for the task.
The one time that the Slovak 8.35cm vz.22's did actually see front line field service was during the Slovak uprising of 1944 where the 10th Heavy Battery was assigned to the protection of Tri Duby airfield and the rebel radio transmitter. This battery remained in Hajniks until the last days of the uprising and was also considered one of the best rebel units available. It was the 10th Battery that prevented the rebel forces retreat to the mountains collapsing into a rout. This battery continually stood its ground against pursuing enemy forces until reaching Donovaly where they were forced to abandon their guns and stores and head into the mountains. This 'Anabasis' is important and remarkable because these guns, long considered unsuitable for field deployment had made it to a height of almost 1000m over poor roads and being pulled by old Skoda Z trucks.

Now, this potted history does raise some interesting questions as to whether or not it is even worth bothering with the construction of the Praga T-9's and the Skoda 8.35cm vz.22 cannons... in short; No! It isn't! unless of course you are interested in gaming a hypothetical 1938 Munich crisis scenario or else the Slovak uprising (although of course you could go through the pain of modelling these for German use as well). Although I guess the T-9's would be handy for pulling the 88's in the early part of Barbarossa.
Now that I've already done it and then found this out I'm thinking that it may be worthwhile actually doing an Intelligence Briefing covering the Slovak armed forces up to 1942....
Anyway, seeing as we are all here I may as well share with you how I did this pointless project! LOL

Unfortunately these were one of the first projects that I did for my Slovaks after doing all of the infantry so I don't actually have a photographic build log for these pieces so instead I will just try to talk you all through what I did instead.
So, the original guns are the now discontinued Battlefront's SU543 Soviete 85mm obr 1939 gun pack which contains one gun and eight crew. The Soviet 85mm was fired from a cruciform platform after removal of wheel and axle assemblies and tow bars. Because of this it was clear that the platform would need adjustment as the Czech gun was fired from its wheeled platform.
The axles for the wheels were realigned and had brass rod inserted to make it a straight axle assembly which were then glued straight onto the platform. Once the wheels (which required no adjustment) were glued on, you then have the permanent height of the gun platform.
The Stabilisation Outriggers are the next thing to be done. Use the old cruciform outriggers and cut away the circular foot off of each of them (and the same goes for those on the main platform as well). Drill holes through the two extended outriggers towards their ends and push plastic rod through and push down to the floor. Shear off the waste about 5mm above the outrigger arms. At the end of each column glue a small plastic disc of an appropriate diameter to represent the feet of the outriggers.
The axis upon which the wheel axles are glued also need to be trimmed back to shorten the arm almost to the edge of the wheel axle blocks themselves.

The forward tow hook on the same side of the platform as the carriage seats is now glued on with its ring resting on the ground. A pair of seats are now modelled out of styrene sheet. I used two blocks glued together at an angle and carved and sanded the seats out of them. Do them whichever way suits you best though!
On the other side you will see another tow hook that seems to be at rest floating in mid air. This is the barrel ring that prevents the barrel of the weapon swinging around when in transit. This is the part that I probably found the most awkward to model. I had to cut out two small rectangular blocks and round off one end into a half circle. On this rounded end a hole is drilled through and a small brass rod is inserted. The two blocks need to have an outside gauge that just fits inside the two foot bars of the barrel ring mount arms. Once this gauge has been achieved the brass rod is glued in place and filed off on the outside of each of the blocks. This block assembly is glued on top of the rear wheel axle block and the barrel ring and arms are glued onto it and left resting in thin air as seen in the photos.

The last major piece of construction work for this weapon is the gun itself. The barrel and recoil buffler is removed. The barrel is removed up to the ring notch in the barrel situated behind the barrel clamps securing the buffler housing to the barrel. The buffler is removed completely.
A styrene tube is cut in half and added to the back of the gun as its new Breech Cradle. Another section of styrene tubing is used as a new barrel. No muzzle brakes were on these barrels BUT they did have a strengthening ring on the muzzle face so some very thin styrene strip was glued around the end of the barrel to simulate this.
Finally the recoil bufflers are made out of two equal length strips of styrene tube just less than half the length of the barrel. They are filled or drilled and small brass rods are inserted and left with 1mm length extruded from the body of the bufflers.
All of these elements are then glued onto the remaining gun breech and glued to the platform pintle.
The last step is to construct the pneumatic balancing gear for either side of the barrel. A pair of styrene discs are glued onto the breech block facing outwards and positioned just behind the point where the new barrel is glued onto it. A short styrene tube is glued at 90deg on the outside edge of this disc and running down to the cradle at the level of the Elevation Handwheels and glued onto the upper face of the cradle at this level
...and there you have it. A completed gun!

Before we go any further I should also point out that the majority of miniatures in this battery are the original Battlefront 15mm Soviet crew with a few Romanian artillery crew with their heads nipped off and replaced with Peter Pig heads to turn them into Slovaks. Either the ones with the Slovak Helmets that Martin sculpted for me or else the ones with the Soviet Pilotka Caps are suitable. The Soviet crew needed no adjustments so long as you are capable of painting Slovak puttees over the originally sculpted leather boots.
The first thing that I normally do when putting together a battery once the guns are built is actually to paint all of the crew that serve the guns and where my Slovaks are concerned this obviously took a bit of work so let me take you through it all!
So, where painting all of the infantry is concerned its a relatively simple affair. They are done the way that I do them to look good from about 5ft away. Scrutinise them from up close and all of the flaws in the painting will probably slap you in the face.
The first step is to prime, and as with most of my other historical stuff, I prime with a black etch primer. You can buy these from any hardware store but the 'etch' in the primer ensures an exceptionally strong substrate to the acrylic layers that will go over the top.
The lions share of the work done on WW2 miniatures is the main uniform and where the Slovaks are concerned after a somewhat lengthy research period I decided to ditch the colour photos from the past and go with the uniform colours that all of the re-enactors in Czechoslovakia are using at the moment. In my experience all re-enactment guys are anal about accuracy so I would trust their opinions a lot more than raggedy old photos that have been recoloured.
My base coat was done with Vallejo's 887 Brown Violet for the deepest layers of the uniform. The first highlight, which presents the largest overall surface area that will be seen at the end was done with MIG's 113 Khaki Green No3 (Brit 1939-1942) with the final highlights along all of the raised edges being completed with MIG's 058 Light Green Khaki. This covers all of the cloth uniform and the puttees.
The helmet has a single coat of 50/50 mix of Vallejo's 897 Bronze Green and Vallejo's 887 Brown Violet with the blue helmet band having a basecoat of Vallejo's 925 Intense Blue, highlighted with a 50/50 mix of Vallejo's 925 Intense Blue and Vallejo's 943 Blue Grey. The little Slovak crosses are all hand painted with thinned down Vallejo's 820 Offwhite.
Everything else is relatively quick and simple after painting the uniform.
All of the Canvas bags and straps have a basecoat of Vallejo's 921 English Uniform applied with block highlights of AK Interactives 3072 M-44 Uniform Green Ochre Khaki whilst the leather belts and ammo pouches are basecoated in Vallejo's 045 Charred Brown and highlighted with Vallejo's 983 Flat Earth.
The boots are any matt black whilst the Gas Mask Tins are basecoated with Vallejo's 980 Black Green and highlighted with Lifecolor's UA224 Olive Drab Faded Type 2.
The rifle bodies are basecoated with Vallejo's 826 German Camo Medium Brown with the highlighted grain lines painted with Vallejo's 981 Orange Brown. All metal work is painted black firstly and highlighted with Molten Metals Steel. The rifle straps are basecoated with Vallejo's 880 Khaki Grey and highlighted with a 50/50 mix of Vallejo's 880 Khaki Grey and Vallejo's 819 Iraqi Sand.
Where the skin is concerned you can paint it how you please but personally I use one of AK Interactive's paint sets for 'Flesh and Skin Colours' and I've never looked back!

All of the bases are actually really simple. I buy all of my bases from Tony at East Riding Miniatures. Hes a bit of a legend and REALLY helpful. They are all laser cut MDF which allows for easy scoring of the base surface.
I then glue the miniatures to the scored surface and apply a thin layer of tile grout over the top. Once this is dry I glue a layer of one of my sand mixes over the top. Generally speaking I create my own mixes for base coverings as I REALLY don't like a lot of the crap you buy from the shops. Its generally speaking far too gaudy in colour or uniform in texture for my tastes.
I like the generally fine sand BUT I like to have lots of the little stones in there so I can create some colour contrasts with the dirt on the bases.
Once dry the whole base is given a basecoat of Vallejo's 826 German Camo Medium Brown and given a heavy drybrush of Vallejo's 814 Green Ochre.
All of the little stones on the bases are then given a basecoat of Vallejo's 995 German Grey and roughly highlighted (to create a jagged uneven texture) with any lighter grey of your choice but personally I go with Vallejo's 992 Neutral Grey.

The sides of the bases are now painted Matt Black. I never used to bother with this BUT I've really gotten into the clean precise look this lends to the bases. I love it now.
Now we come to the final stage of the bases which is the covering. The static flock that I use is my own mix. I go for something that approximates the dead and dry grass you find on the Steppes with perhaps a little more green in it than usual. This allows an overall base aesthetic that can be used the length of Europe in my opinion.
To provide the final textural boost to the bases though I use a variety of clumps. I had a LOT of problems finding ones that I felt were suitable but after a couple of years I came across a company called Tajima Miniatures whose self adhesive tufts are without a doubt the best I have ever found. I use there stuff by the bucket load now, in great variety.
These all add to the final colour and texture of the bases of this army.
Now that the bases and the miniatures are all squared away the only thing left to do is sort the guns themselves out...

So the painting of the guns is where the real complexity begins. I should also point out by the way that I have opted not to apply mud and spattering weathering to these artillery pieces as I kind of really like the clean look of them. They do have plenty of knocks and rusty battered parts which adds to the scheme but that is where I have chosen to draw the line.
The main paint scheme of the guns is done by airbrush using my MIG Aircobra for the Priming and Basecoating and my Harder & Steenbeck for all of the shading and highlighting as my H&S has a 0.15 needle and provides a hell of a lot more control... but the MIG is SOOOOO easy to clean it just makes sense to use it where I can...
The Airbrushing steps are as follows:
i) The model is primed with a Matt Black Etch Primer
ii) The basecoat is Tamiya's XF-58's Olive Green
iii) The first highlight is LifeColors UA221 Khaki Olive Drab applied in a panel highlight fashion
iv) The second highlight is LifeColors UA224 Olive Drab Faded Type 2 applied as above but a bit lighter and gathered in along the edges and prominent areas
v) The third highlight is a 50/50 mix of LifeColors UA224 Olive Drab Faded Type 2 with LifeColor 01 White. This is applied sparingly just along the edges and prominent areas.

So that's the airbrushing complete and don't be overly concerned if your third highlight was too heavy as the next step will, if done correctly will tone the whole contrasted effect down.
vi) Now we apply the Filter over the whole thing to unify the colour aesthetic and clip the contrast a little. I apply MIG's Filter 1506 Brown for Dark Green.
vii) Once dry wipe of any serious excess from where it may have pooled but otherwise leave it untouched.
viii) At this point I apply the first layer of Varnish. It doesnt matter which varnish you choose so long as it fixes the Filter layer as its an oil based layer.
Once the varnish is dry its time for the next layer which is where the real depth starts to come out.
ix) Over every detail laden part of the model apply a Wash. I use AK Interactives Wash 075 Wash for NATO Camouflage Vehicles. Don't be shy with this step. Slap it on aplenty! Then leave to dry for a while.
x) Once its dry use cotton buds (cue tips for you Yankees out there...) and use a gentle white spirit to wipe away the excess leaving great detail and shadowing around all of your detail areas and a general lowering of the overall chroma luminosity. Personally I use Winsor & Newtons Artists White Spirit as I had a bad experience with normal white spirit and have no wish to repeat the disaster!
xi) Once the whole piece is dry to the touch apply another layer of varnish to fix everything in place.
... once all of the actual painting steps proper have been squared away the last thing to do on the miniature is actually the rusted patches. For this just use an old kitchen sponge and dab on Vallejo's Panzer Aces 302 Dark Rust along the edges of the gun shield and other edges and spots across different patches of the model.
These Dark Rust elements then have the heaviest sections lined with Vallejo's Model Color 819 Iraqi Sand. These lines need to be very fine but also work well to work in as actual scratches into the overall paint scheme.
The very last thing that needs to be done with the painting is the wheel rims which are painted with LifeColor's UA733 Tire Black and highlighted with Vallejo's Model Color 995 German Grey.
Varnish one final time with a super matt varnish and that as they say is that!
Remove from workspace and attach to the finished bases at your leisure!
...and there we have it again ladies; another battery to use for your Slovaks (or Germans if you are feeling adventurous!)
Until next time... FIX BAYONETS!
Amazing historic detail and incredible patience. What about the Praga T-9 tractor origin?
ReplyDeleteThanks Sybren. Glad you like it all. The T-9's, the Praga RV trucks and the Tatra 57k staff car will all be done in their own post. Watch this space mate ;)
DeleteHi, I don't know if anyone still reads this but... I believe to have some sort of aiming device from one of the four Vz18/19 cannons sent to Sweden in 1921. It says "8 cm létadlové dělo vz18/19" it also says "Terrängvinkel" which is Swedish for angle of terrain. Are there any pictures of the Vz18/19? I've tried googling but it only brings me back to this article.
ReplyDeleteHi there unknown,
DeleteI'm not sure how much help this will be but when I was putting my Slovak army together a website that I used a lot was https://delostrelectvocsarmady1918-1939.estranky.cz/
Hopefully you can find some stuff on there. Failing that contact the manufacturers directly and see if they can point you in the right direction.
Good luck.