... and so finally we come to the end of our Slovakian odyssey (of course that's not to say in the future I won't consider adding some Praga AV staff cars and some LT vz.38's and 40's) but for now? No!!! That's it! I'm done with all things Slovakian for a while.
I thought we would tie the rope around the neck of the project with a look into the vehicles that I actually sculpted and cast for the army. Just a short section on each, y'know a bit of history (as I am wont to do on occasion) a description of how I painted them and a couple of photos of them in production and finished.


Nothing too labour intensive! I want to finish on a high note if you know what I mean?
So what are we going to take a look at then?
Well first of all it has to be the backbone of the Slovak Mobile forces; the Praga RV truck of which I made three types; the canvas back, the box back and the pioneer truck.
Secondly we will look at the Praga T-9 artillery tractor. A big beast of a machine that sadly only saw a short service lift BUT looks great when its put with its heavy anti-aircraft batteries.
Finally we will take a look at the Tatra 57k 'Hadimrška' staff car. I chose this one over the larger six wheeled Praga AV staff car because primarily it was quicker and easier to knock out, secondly the Germans used plenty of them so they were a good analogue for a German staff car as well and by the time Slovakia marched across the border of the Soviet Union they were using so many different types of automobiles that I didn't think it made much difference what I chose.
So... let us begin!
The Praga RV
The Praga RV was an army off-road truck model that was designed and manufactured by Praga between 1935 and 1939. It was predominantly used for transporting military cargo and personnel, as an ambulance and for towing artillery in the Czechoslovakian and later Slovak, German and Romanian armies. A total of 3290 vehicles were slated for use in Czechoslovakia whilst the rest of a total of 5500 produced units, were exported to Iran, Peru, Poland, Sweden, Switzerland and Turkey.


The Praga RV engine was able to work up 3468cc providing 68 horsepower at 2600 rpm. The fuel consumption was anything up to 35 litres per 100km which was a respectable figure (the German Opel Blitz for example used 30 litres per 100km which was one of the best in its class). The PRaga RV had three axles of which both rear axles were powered. It had four forward gears and one reverse gear so it was easy to drive too. It had a rated payload of 2000 kg and was capable of travelling at 43 mph for a total of 390 km without needing to stop to refuelling its 137 litre fuel tank.
When carrying infantry the typical capacity was 8-12 men with all of their equipment. 7-11 in the rear deck and one more in the cab with the driver.

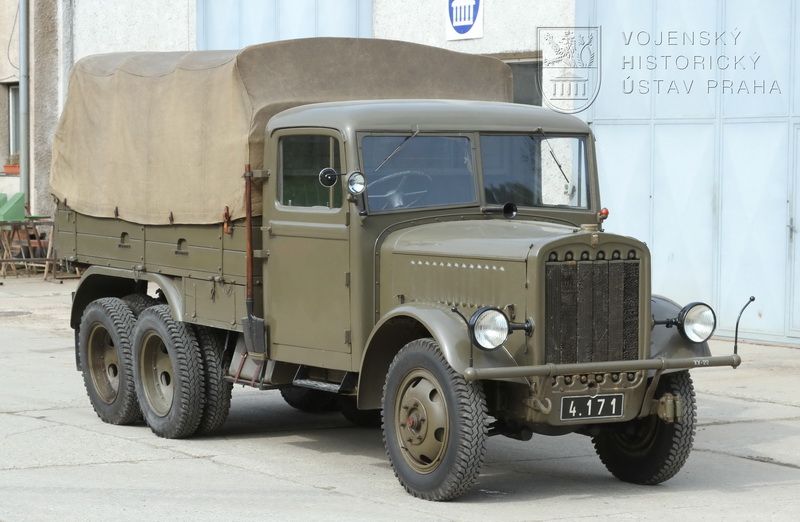
On top of all of this it was also capable of pulling a three ton trailer load, be that an artillery piece or other wheeled vehicles although with the trailer the fuel consumption did increase to 49 litres per 100 km.
In 1938 fifty nine of the trucks were chosen to be converted into radio communication vehicles for use with the Fast Divisions and motorised assets.


Feedback on the use of these trucks under combat conditions was favourable with Maczeks Polish Black Brigade's reconnaissance battalion using a lot of them in their campaign across Southern Poland in 1939. The Slovakians kept a hold of these vehicles as long as they could due to their reliability and longevity whilst no complaints were heard from either the Germans or the Romanians!
The Praga T-9 Artillery Tractor
So, this is one of my favourite pieces in case you couldn't tell?
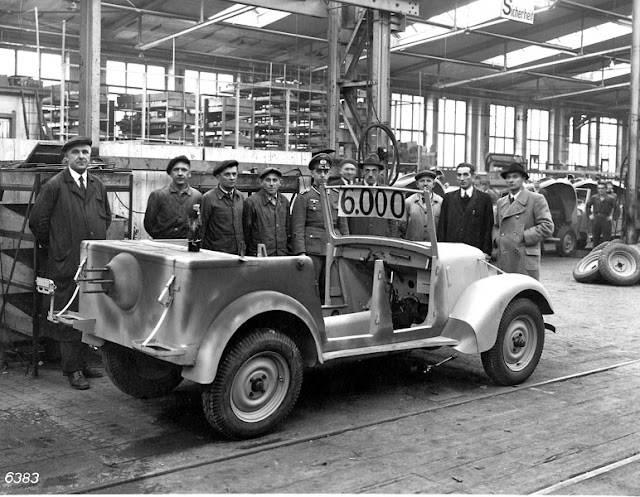
The Praga T-9 was a Czechoslovakian heavy artillery tractor designed in the late 1930's and was used by Slovakia and Germany during World War 2 in order to pull their heavy anti-aircraft artillery.

In 1937 a heavy artillery tractor was developed at the Ceskomoravska Kolben Danek (CKD) plant in Prague for the Turkish army. This vehicle was designated T-9. Turkey ordered a total of 66 vehicles of this type but between 1937-1939 only 16 tractors had been manufactured and sent to Turkey (as seen in the image above).
After the occupation of Czechoslovakia by Germany in March 1939 further production of this vehicle was assumed by Germany and after completion an additional series of 10 vehicles was also produced. Production ceased completely in 1943 by which time a total of 76 T-9 tractors had been manufactured between 1937-1943.

The tractors that were taken over by the Germans assumed the identity Schwerer Raupenschlepper T9(t).
16 of the tractors produced were supplied to the Turkish army whilst the Germans took 55 for themselves leaving Slovakia with a grand total of five where they were used to tow the newly provided 88mm anti-aircraft guns in the Slovak Fast Division.

The T-9 was constructed around a tracked chassis which supported an enclosed unarmoured crew cabin and a cargo compartment that could be covered with a tarpaulin. The cargo deck had room for six soldiers with all of their equipment.
It was equipped with a 6-cylinder petrol engine with a capacity of 14,230 cm cubed, was water cooled with 142 bhp and was adapted to tow a trailer or pull an artillery piece weighing up to ten tonnes as well as being able to carry a further ton of weight on its cargo deck.

Due to problems with the engine and transmission the Praga T-9 was withdrawn from service by the Slovaks towards the end of their campaign in the Soviet Union and replaced with German tractors instead.
The Tatra 57k 'Hadimrška' staff car
So this innocuous little car was produced by the thousand by Czechoslovakian manufacturer Tatra. The 'k', from the German 'kubelwagon' was a military version of the Tatra 57 produced between 1941 and 1947.

The car was derived from the Tatra 57B, with the chassis being given greater ground clearance than the 57B to enable better terrain negotiation. This was achieved by adjusting the location of the front axle pins and using reinforced leaf springs on both axles.

The front of the body almost matched the 57B but moving from the windscreen back there were a lot of differences between the cars. The angular five seater body had four small doors, a folding canvas roof and makeshift side windows.
A spare wheel and two 20 litre jerry cans were hung on the back on an upright tail wall. Some cars were also fitted with a folding windscreen. In addition to this the car was equipped with a dashboard lubrication pressure gauge, Furthermore, closures for direct dispensing of gasoline or ether were placed in the suction line to facilitate starting the engine in extremely cold weather.

The car was designed and manufactured at the Ringhoffer Tatra Werke AG factory for the Wehrmacht up until 1944 of which a number were provided to the Slovakian armed forces. During 1941, 200 T57k cars were produced, more than 2,000 the following year and more than 3,500 in 1943.

After the war the production of the T57k series continued and amounted to the sum of a further 500 units by Tatra which were used by the newly reformed Czechoslovakian military and Ministry of the Interior before being gradually replaced.

It had a 1256cc overhead valve flat four cylinder engine that produced 24 bhp. Its fuel consumption was between 8-10 litres per 100 km and the bodies that were available included a four seat saloon, a four seat convertible and a two seat convertible. All versions had only two car doors.
So I think thats enough of the history, now why don't we crack on the with the modelling?
With regards to the sculpting and casting of these vehicles I would like to say that its a lot simpler than you may be inclined to think.
Essentially I work from schematics that have been scaled to the size of the piece that I want to produce and then I use different types of plastic sheet, rod and tubes, along with brass sheet, rod and tube and a selection of different sculpting resins to think my way around how to produce the shapes.
Below are examples of the types of schematics I use:


Once the master has been produced I then need to create the mold for it and get them cast up.

You can see an example of one of my finished masters above; the Praga T-9 artillery tractor before the side plates for the track sections are applied to it. This was cast up in three separate pieces, with the main body and the two separate track sections.

... and above you can see an example of a single piece casting. After I completed my Black Brigade project I reflected that one of the most problematic areas was the fact that I had cast all of the wheels separately which turned out to be a monster pain in the ass so when I was sculpting all of my new vehicles with a solid plinth which allowed me to place the wheels directly onto the master without an introduction of a weakness into the vehicle.
One of my previous posts is about the casting up of all of my Polish Black Brigade vehicles so I wont waste time with it here suffice to say that I use two part silicon to create the mold. It is poured over the vehicle I am making the mold for which is placed onto a blu-tack plinth on a wooden base board and surrounded with Lego walls.

When the silicon is poured the whole thing is then placed in a vacuum cylinder until the majority of the air bubbles are forced out of it. The whole thing is then placed on a shelf overnight until ready for the casting.

The casting is conducted in the same process as making the mold except this time instead of the Lego wall and wooden base board the two part resin is poured directly into the mold which is then immediately placed into the vacuum cylinder until the air is drawn out.
If you don't do this the final cured cast of the vehicle will be covered in tiny holes... not a nice end to your work.
Once all of these vehicles has been cast up and placed to one side they then need to be cleaned up. Without a doubt the messiest part of the job.

As you can see from the image above, all of the cast vehicles come out of their molds still mounted on a resin plinth. These need to be removed.

It is this particular part where all of the mess is concerned... a lesson that I had to learn the hard way! With over 40 vehicles to cut off of their plinths with my Dremel disc saw I certainly wasn't expecting what I got.
My work room was covered and I do mean COVERED in resin dust!!!

However the final results can't be argued with.

Truth be told though, after three hours or so of cleaning vehicles with a disc saw I walked out of my man cave somewhat covered and thanking God that I had a decent face mask... could really have done with some decent goggles though... Take note guys!
So the painting of these vehicles is where the real complexity begins, however one good thing is that the same paint scheme is used all the way across all of them. I should also point out by the way that I have opted not to apply mud and spattering weathering to these pieces as I kind of really like the clean but battered look of them. They do have plenty of knocks and rusty battered parts which adds to the scheme but that is where I have chosen to draw the line.
The main paint scheme is done by airbrush using my MIG Aircobra for the Priming and Basecoating and my Harder & Steenbeck for all of the shading and highlighting as my H&S has a 0.15 needle and provides a hell of a lot more control... but the MIG is SOOOOO easy to clean it just makes sense to use it where I can...

The Tatra 57k 'Hadimrška' staff car
So this innocuous little car was produced by the thousand by Czechoslovakian manufacturer Tatra. The 'k', from the German 'kubelwagon' was a military version of the Tatra 57 produced between 1941 and 1947.

The car was derived from the Tatra 57B, with the chassis being given greater ground clearance than the 57B to enable better terrain negotiation. This was achieved by adjusting the location of the front axle pins and using reinforced leaf springs on both axles.

The front of the body almost matched the 57B but moving from the windscreen back there were a lot of differences between the cars. The angular five seater body had four small doors, a folding canvas roof and makeshift side windows.

A spare wheel and two 20 litre jerry cans were hung on the back on an upright tail wall. Some cars were also fitted with a folding windscreen. In addition to this the car was equipped with a dashboard lubrication pressure gauge, Furthermore, closures for direct dispensing of gasoline or ether were placed in the suction line to facilitate starting the engine in extremely cold weather.

The car was designed and manufactured at the Ringhoffer Tatra Werke AG factory for the Wehrmacht up until 1944 of which a number were provided to the Slovakian armed forces. During 1941, 200 T57k cars were produced, more than 2,000 the following year and more than 3,500 in 1943.

After the war the production of the T57k series continued and amounted to the sum of a further 500 units by Tatra which were used by the newly reformed Czechoslovakian military and Ministry of the Interior before being gradually replaced.

It had a 1256cc overhead valve flat four cylinder engine that produced 24 bhp. Its fuel consumption was between 8-10 litres per 100 km and the bodies that were available included a four seat saloon, a four seat convertible and a two seat convertible. All versions had only two car doors.
So I think thats enough of the history, now why don't we crack on the with the modelling?
With regards to the sculpting and casting of these vehicles I would like to say that its a lot simpler than you may be inclined to think.
Essentially I work from schematics that have been scaled to the size of the piece that I want to produce and then I use different types of plastic sheet, rod and tubes, along with brass sheet, rod and tube and a selection of different sculpting resins to think my way around how to produce the shapes.
Below are examples of the types of schematics I use:


Once the master has been produced I then need to create the mold for it and get them cast up.

You can see an example of one of my finished masters above; the Praga T-9 artillery tractor before the side plates for the track sections are applied to it. This was cast up in three separate pieces, with the main body and the two separate track sections.

... and above you can see an example of a single piece casting. After I completed my Black Brigade project I reflected that one of the most problematic areas was the fact that I had cast all of the wheels separately which turned out to be a monster pain in the ass so when I was sculpting all of my new vehicles with a solid plinth which allowed me to place the wheels directly onto the master without an introduction of a weakness into the vehicle.
One of my previous posts is about the casting up of all of my Polish Black Brigade vehicles so I wont waste time with it here suffice to say that I use two part silicon to create the mold. It is poured over the vehicle I am making the mold for which is placed onto a blu-tack plinth on a wooden base board and surrounded with Lego walls.

When the silicon is poured the whole thing is then placed in a vacuum cylinder until the majority of the air bubbles are forced out of it. The whole thing is then placed on a shelf overnight until ready for the casting.

The casting is conducted in the same process as making the mold except this time instead of the Lego wall and wooden base board the two part resin is poured directly into the mold which is then immediately placed into the vacuum cylinder until the air is drawn out.
If you don't do this the final cured cast of the vehicle will be covered in tiny holes... not a nice end to your work.
Once all of these vehicles has been cast up and placed to one side they then need to be cleaned up. Without a doubt the messiest part of the job.

As you can see from the image above, all of the cast vehicles come out of their molds still mounted on a resin plinth. These need to be removed.

It is this particular part where all of the mess is concerned... a lesson that I had to learn the hard way! With over 40 vehicles to cut off of their plinths with my Dremel disc saw I certainly wasn't expecting what I got.
My work room was covered and I do mean COVERED in resin dust!!!

However the final results can't be argued with.

Truth be told though, after three hours or so of cleaning vehicles with a disc saw I walked out of my man cave somewhat covered and thanking God that I had a decent face mask... could really have done with some decent goggles though... Take note guys!
So the painting of these vehicles is where the real complexity begins, however one good thing is that the same paint scheme is used all the way across all of them. I should also point out by the way that I have opted not to apply mud and spattering weathering to these pieces as I kind of really like the clean but battered look of them. They do have plenty of knocks and rusty battered parts which adds to the scheme but that is where I have chosen to draw the line.
The main paint scheme is done by airbrush using my MIG Aircobra for the Priming and Basecoating and my Harder & Steenbeck for all of the shading and highlighting as my H&S has a 0.15 needle and provides a hell of a lot more control... but the MIG is SOOOOO easy to clean it just makes sense to use it where I can...

The Airbrushing steps are as follows:
i) The model is primed with a Matt Black Etch Primer
ii) The basecoat is Tamiya's XF-58's Olive Green
iii) The first highlight is LifeColors UA221 Khaki Olive Drab applied in a panel highlight fashion
iv) The second highlight is LifeColors UA224 Olive Drab Faded Type 2 applied as above but a bit lighter and gathered in along the edges and prominent areas
v) The third highlight is a 50/50 mix of LifeColors UA224 Olive Drab Faded Type 2 with LifeColor 01 White. This is applied sparingly just along the edges and prominent areas.


So that's the airbrushing complete and don't be overly concerned if your third highlight was too heavy as the next step will, if done correctly will tone the whole contrasted effect down.

vi) Now we apply the Filter over the whole thing to unify the colour aesthetic and clip the contrast a little. I apply MIG's Filter 1506 Brown for Dark Green.
vii) Once dry, wipe off any serious excess from where it may have pooled but otherwise leave it untouched.
viii) At this point I apply the first layer of Varnish. It doesn't matter which varnish you choose so long as it fixes the Filter layer as its an oil based layer.
Once the varnish is dry its time for the next layer which is where the real depth starts to come out.

ix) Over every detail laden part of the model apply a Wash. I use AK Interactives Wash 075 Wash for NATO Camouflage Vehicles. Don't be shy with this step. Slap it on aplenty! Then leave to dry for a while.
x) Once its dry use cotton buds (cue tips for you Yankees out there...) and use a gentle white spirit to wipe away the excess leaving great detail and shadowing around all of your detail areas and a general lowering of the overall chroma luminosity. Personally I use Winsor & Newtons Artists White Spirit as I had a bad experience with normal white spirit and have no wish to repeat the disaster!
xi) Once the whole piece is dry to the touch apply another layer of varnish to fix everything in place.
... once all of the actual painting steps proper have been squared away the last thing to do on the miniature is actually the rusted patches. For this just use an old kitchen sponge and dab on Vallejo's Panzer Aces 302 Dark Rust along the edges of the gun shield and other edges and spots across different patches of the model.


These Dark Rust elements then have the heaviest sections lined with Vallejo's Model Color 819 Iraqi Sand. These lines need to be very fine but also work well to work in as actual scratches into the overall paint scheme.
The canvas backs on the Praga RV's and the Tatra 57k had a base coat of MIGs Khaki Green No.3 (Brit 1939-42). The first highlight was applied with Vallejo Model Color 821 German Camo Beige and a final highlight of Vallejo Model Color V819 Iraqi Sand
The windows are all painted the same way with a GW Base Abaddon Black with thin white lines (any white will do) to emulate reflections.
The very last thing that needs to be done with the painting is the wheels and tracks. The wheels are painted with LifeColor's UA733 Tire Black and highlighted with Vallejo's Model Color 995 German Grey.

The Praga T-9 tracks are somewhat of a different proposition though with a number of steps as follows:
i) A basecoat of Vallejo Panzer Aces 304 Track Primer is applied all over the tracks
ii) Vallejo Model Color 863 Gunmetal Grey is drybrushed across the tracks
iii) A wash of AK Interactives 083 Track Wash is then applied across the tracks.
iv) A light coating of AK Interactives 065 Afrika Korps Filter is then applied to the bogies
v) Once the above coat is dry the profiling of the tracks and bogies can be done using AK Interactive's 075 Wash for NATO Camo Vehicles with the excess then wiped away and then left to dry
vi) Now is the time to apply your weathering pigments if you choose to go this far,
Varnish one final time with a super matt varnish and just to finish everything off completely put a super gloss varnish over any windows that you have painted and that as they say is that!
So there we have it ladies and gentlemen, we have reached the end of my Slovakian adventure. We've covered a lot of ground and I hope that if there are any of you out there that want to do a Slovak army that all of these posts will provide you with a solid basis of being able to put your own one together...
Now go have fun and remember to pack your bayonets!
Now go have fun and remember to pack your bayonets!
What a work of love and patience, to develop and make these models yourself! Chepeau!!!
ReplyDeleteThanks Sybren, I am rather proud of these ones if I am to be honest. A long way from perfect to be sure but certainly the best Ive yet managed I think...
DeleteI just found your blog, but this is an awesome project! Amazing that you chose to mold the vehicles yourself! I am kinda amazed there is no market for any of the Czech trucks or tractors given the Czech army in Flames of War.
ReplyDeleteHey Alan,
DeleteThanks for the kind words. I think I just cant help myself with these kinds of projects. Something big and historical I can get my teeth into. I reckon there isnt much market for the Slovaks in WW2 (and by extension the prewar Czech army) simply because they just do not get the exposure that they deserve. I hope that my humble project in some way helps to make up lost ground where that is concerned! :)
I get that, I love the rare and unusual army, though I can't say I would ever go to the sheer amount of work that you have here! I am seriously impressed, and inspired, got myself some Lt. 38s to paint up as a first step to following your example!
DeleteI think thats really cool Alan. Its great to have a convert to the Slovaks :) Good luck with the project.
DeleteI've started a Slovak force of my own in 15mm and have been wracking my brains trying to find something that could be "converted" into a T9 tractor. Then I found your site :-)
ReplyDeleteIn the spirit of you don't know 'till you ask, would you be willing to cast up one of your T9 models for me? I'm happy to cover your costs in time & meterials etc.
Many thanks
Gary
Hi Gary,
DeleteThanks for reaching out. I can help you with the T-9's, although not immediately. Find me on Facebook and PM me and we can arrange things.
Cheers
Thanks for getting back to me, and apologies for the tardy reply:-(
ReplyDeleteI'm not a user of Facebook but you can reach me at grwill66000@gmail.com.
Not sure if you are interested in Slovak air assets but I may have something of interest to you by way of a trade for the T-9. If you can drop me a mail at the above I'll provide some more details etc.
All the best. Gary
Hi! I've stumbled across your blog by virtue of hunting down my own resources for a 15mm Slovak National Uprising project. I'm wondering if you'd have any interest in selling a few copies of the trucks you casted up. They look lovely. Thanks! The Army project has been really inspiring.
ReplyDeleteHi Evan,
DeleteIm happy that I was able to provide some inspiration for you mate. I think the Slovaks are a fascinating part of the Second World War and Im always happy to see people take an interest. I will be happy to provide some Praga RV's for you but I wont be able to do it immediately because Im renovating at the moment. My Hobby Room should be ready within three months now and I will be able to get out all of my sculpting and casting gear then, if you are happy to bear with me a little while?
Sorry- I'm not good with blogspot apparently. I thought I had penned a reply back on the 31st but it looks like it didn't go through.
DeleteNo sweat over it taking a bit! I'm ecstatic that you're willing to help and have to wait for BF to re-release the Romanians in July regardless (the Vichy French I had planned to use weren't working quite as well.) Just let me know how much you think a fair price would be and I can paypal you. I'd offer a trade but aside from a 3D printer I have very little in the way of related projects.
If it's easier for you too, I can be reached at eclark262@gmail.com
Great vehicles! You seem to be a true historical wagamer... such detail of information!
ReplyDeleteThanks Skully, Ive been pretty quiet of late because of my house renovations but I really do love the historical research part of putting an army together. Spanish Civil War armed forces will feature largely in my future I think :D
Delete