So I thought that to round off the mountainous volumes of modelling blogs covering Stanislaw Maczek and the Black Brigade I thought it would be good to take a closer look at how I did the bases on all of these Black Brigade miniatures to round off this series (The Black Brigade uniforms post is having all of its stuff translated from Polish sources at the moment and is coming up).
I know that by now the majority of you will either have square eyes, will have slipped into a military history related coma or else just have no interest in reading my voluminous posts so this time we are going to deal with the modelling only. The bases. A short post...
So lets crack on...
The Basing of the Brigade...
I've been modelling the Polish for a couple of years now and whilst I may have thought a couple of years ago that my stuff was good, now I am smacked in the face with the faults of the painting and modelling every time I sort through them to have a look.
Fortunately I've had more than enough items to paint in my Polish army that I've been able to adjust what I've done until I've reached a level that I'm genuinely happy with what I'm turning out now. I think I reached that point with my Polish cavalry... I just love looking at them... mostly.
The one thing that has always got my hackles up is my bases.
I've spent years searching around and buying in stupid varieties of static flock to find a shade that I'm happy with, never having succeeded. The flock that I've used on my Poles I am convinced actually glows in the dark! (obviously I've never tested this out :D )
Until this project...
 |
| Furniture and fittings to be used to dress the bases to be made |
I made the decision early on that because this was going to be my signal project for 2017 that the bases needed to be done with considerably more care and attention than my usual 'just get 'em knocked out' strategy and so because of this I started looking around and as so frequently happens with my modelling I found myself reading some stuff that Ruben (Torregrosa for those of you that don't know who he is) had put out to the community as a whole on how to go about creating bases with a little more zing.
Now his stuff is intensely insane, the amount of hours that he must put into it is a terrifying prospect to some of us out there and I just quite simply am not that patient a person. I need to see things finished if I am to stay interested in them, and so I decided that I would follow him in some areas but not in others!
I knew that I wanted my 10th Mounted Rifles based as if some of them would be fighting in Lancut and so I bought some furniture items off of Peter Pig and then sent abroad for bags of 'n scale' bricks...
These were all duly painted up in a day and made ready to apply to a certain number of bases. I should say now that even though I painted up everything I ordered I had no illusion that all of them would get used because of the extra work that those types of bases would involve.
Instead I just decided to plough on with the basing itself...
 |
| Plain old MDF bases with scored tops |
So the first thing I should point out is that I immediately bin ALL Battlefront plastic bases. I much prefer working with wood. Materials grip SOOOO much better on wood AND the deeper straighter cut of the sides looks more attractive when presented properly I believe.
So the first thing to do is to take your bases, ensure they are the right way up (because these MDF bases from Tony at East Riding Miniatures generally have a slightly bevelled edge) and then score the top surface prodigiously to help provide some contouring for any of the materials you are intending sticking to the surface.
 |
| Magic Sculpt and Garden twigs used to provide some contrast and contouring on the bases |
So, once the bases are all cleaned of rogue wood shavings (I just use an old stiff toothbrush to do this) the next thing to do is to provide some contouring to the bases so they don't just look like those sketchy old flat Napoleonic bases that you can see in '70's photographs of the Wargames Research Group and other such dinosaurs.
I used Magic Sculpt (one of my favourite sculptors epoxy resin) to sculpt some banks along the sides of the bases and then pushed a couple of garden twigs that I had prepared into the resin before it was set.
This was all then left to set for a couple of hours...
 |
| A layer of Tile Grout is applied. |
Whilst waiting for the bases that have topographical contours to set I went to town on all the others.
My weapon of choice for basing is Tile Grout because its as cheap as chips and because of the environment that Tile Grout is designed to work in I have an unexplained belief that it can withstand more punishment than other materials you may use for basing, including being damp resistant, which in my abode is of no mean importance.
A thin layer is spread across the base being pushed into the scores as you go, once completed the edge of the bases are tidied up by just running a wet finger along each edge to clean any excess off!
These are then left to set for a short period of maybe 10 minutes, maybe less, depending on how quickly your grout sets.
 |
| Wet brush strokes are applied to the grout |
The next step to complete is the approximation of dirt road surfaces which were so prevalent across Poland in 1939. As I am modelling a Motorised Brigade I decided that these types of bases were an absolute must.
So with that in mind I decided that the best way to create this kind of surface would be to use a large old flat head brush and gently brush in the same general direction across the grouts surface to create an indication of the traffics direction of travel.
It is important to be careful about timing when you do this part. If the grout is freshly layed then the wet brush will lift most of the grout off as it goes across because grout sticks to itself REALLY well. On the other hand if you leave it too long then you may as well throw your wet brush away and dig out your chisels!
If you get it just right however you can continue to work the grout until you have a series of gentle undulations that give a good indication of general direction of travel of vehicles.
Make sure that when you finish this step that there is still some working time left in the grout as there is another step still to do.
 |
| The imprints of vehicle tires is added |
Now, before we plunge in with preparing these bases there is something that you should do. I took a selection of wheels from the various vehicles that my Polish motorised troops used and put an example wheel of each pushed right into the middle of a cocktail stick.
With the grout still partially soft I was able to press the wheel into the grout and roll it along the base giving the impression of old tracks that have been left.
These bases are then left to totally dry.
Once dry the parts of the base where I want to replicate undisturbed dirt have fine sand applied to them using PVA glue and are then left overnight to dry completely.
 |
| A layer of brown is painted across the whole of the bases |
The base coat of paint is now added across the whole base. This colour is REALLY important because it sets the tone for the whole base and I haven't found anything better for mass use than Vallejo's German Camo Medium Brown. I use so much of this on bases that I think I'm on bottle number 6 at the moment! :D
Doesn't matter if its really dilute so long as the whole base is covered and the colour is uniform. The more dilute the more washed out the eventual look will be which, if you like the dry and dusty look may be exactly where you want to take it...
 |
| A liberal drybrushing brings out the undisturbed dirt |
The next step is to start breathing a little bit of life into the bases by working on the contrasts and set the final tone as an addition to the dominant tone (i.e the German Camo Medium Brown). This is done by using a heavy drybrush across the whole base with Vallejo's Green Ochre. Make sure you aren't applying it so heavily that you end up with paint splotches but heavy enough that there is an appreciable lightening of the base overall (although this could very well depend on your personal tastes).
This lightening will enable you to pick out the areas that you want to turn into dried mud and create the textural contrasts across the base itself.
 |
| The beginnings of the muddy track ways on the bases. |
So now that we are looking at a much improved base this could be a perfect place to stop the painting stages on the base and add the flock BUT as I had a particular vision in my mind for how I wanted these to turn out I decided to go the extra mile for these ones.
The next task is to start building on the impression of dried mud tracks and pathways and this is done by firstly painting a couple of layers of AK Interactive's Dried Mud straight onto the base wherever you want bare earth to show.
This is left to dry completely although there are numerous different ways of applying this dried mud wash and numerous ways to deal with it once it is applied. This is the way that I chose to employ.
 |
| After feathering the dried mud effect the bases look much more homogenous |
Once the Dried Mud wash is dry I used tradesman White Spirits to feather the dried wash into its surrounding terrain. Why do I leave the wash to dry completely before doing this? and why do I use tradesman White Spirits instead of artists white spirits?
Simple really. I use tradesman White Spirits because its harsher than artists white spirits (and I KNOW there will be plenty who disagree with this but I've had projects damaged that went perfectly when I swapped to my Daler & Rowney odourless white spirits) and when combined with the non uniform effect of the feathering that I was looking for I felt that a harsher solvent applied heavily on some of the dried areas and less heavily on others would provide what I was looking for.
In fact the overall result that I attained was to tone the whole base down and provide an effect that I was actually very satisfied with and thus retained it for all of the bases that I completed.
Anyway, once the feathering was complete the bases were once again left to dry completely before a layer of anti shine varnish is applied to the bases to seal the oil based wash and allow painting over the top.
 |
| All of the stones picked out... the devil is clearly in the detail! |
Something that I stumbled across when I first started to build my various collections of 15mm armies is that the devil really is in the detail. If you get the details wrong, or omit them completely then it detracts an incredible amount from your miniatures and what they serve to represent.
Where my bases are concerned because I changed the type of sand that I was using a little while ago I noticed that there were, what amounted to, little pebbles included in it. So I decided that it would provide a great opportunity to create more contrast on the overall basing scheme and as such I decided to paint as many of them as I thought I could cope with.
I would first of all paint them in Vallejo's German Grey and then go back and pick them out with Vallejo's Neutral Grey.
The very last stage to make sure you have done to polish your bases off is to make sure that you tidy up the edges of the bases to make them presentable. Paint them in whichever colours you wish, Brown, green , red, yellow, pink or blue!
Me; I use Games Workshops Chaos Black for the simple reasons that its a relatively thick paint that provides good coverage and a lack of transparency and has a somewhat satin feel to it once it is dry.
Another layer of varnish is applied to the bases in order to seal everything before the flock is applied.
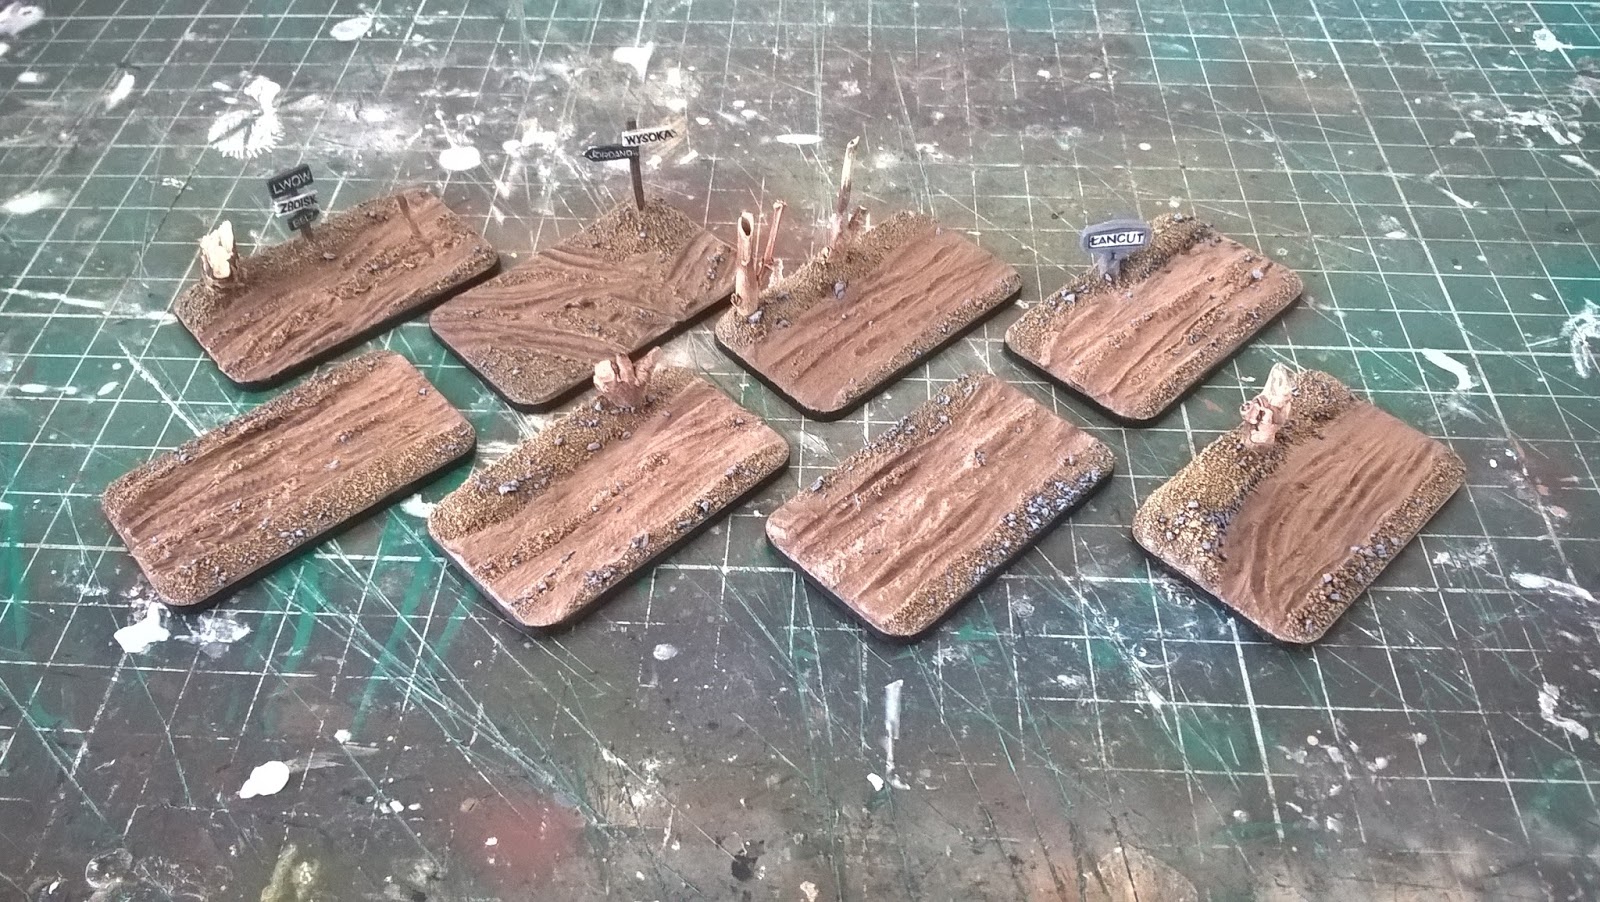
 |
| The bases after the final stage of flocking |
The final stage on my basing is the flocking and I have to admit that flocking has proven quite a problem to me for years.
I have never found a flock that I have been satisfied with, and by now I think I have bought in the region of 30 something different colours. The greens are always just a bit too intense with too much regularity of colour and the sun bleached colours are just tooooooooo bleached... and of course I could never find something in the middle!
Eventually something so unbelievably obvious struck me... why don't I mix my own from the widely varying shades and lengths that I have in my possession?
I mixed about 60% of my 4mm sun bleached fibres with about 40% of my spring 2mm fibres and I essentially just added different volumes until I was satisfied with the colour cast that I had achieved.
Once I had mixed up a batch large enough I found a container to store them in and then turned to the bases.
On each of the bases I applied PVA glue to the 'undisturbed' areas of dirt that I decided I wanted covered with grass and then using my static flock applicator I liberally poured the flock onto the bases.
Once I felt that there was enough on the bases I tapped the excess off and left them to one side to dry
Bosh! Job done.... and not a bayonet in sight!