Tuesday, 10 December 2019

FoW: Slovak Infantry - Mortar Platoons

So... here we are again!.

So, lets carry on knocking down the blog posts eh?

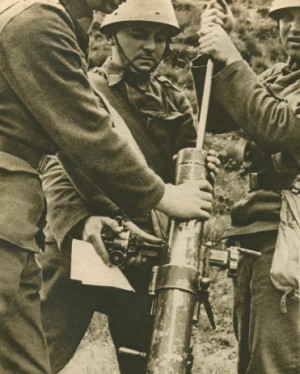
Today, let me introduce you all to one of Slovakia's man portable artillery pieces; the 81mm vz.36 Mortar.

Now as we all know, Slovakia was not the richest of countries on its founding, on top of which Nazi Germany swept in and appropriated fully half of the arms and munitions that was left there so there wasn't much left... well actually there was loads! In fact Slovakia had a lot more artillery pieces than trained crew... and this presented quite the problem.

The 81mm vz.36 mortars provided some much needed artillery support for the foot sloggers... and whats more; one that was easy to get the uneducated masses of troops up to scratch on.


As is so frequently the case with our Slovakian adventure if we need to know any details about them we must first dip a little further back in time to the Czechoslovakian army.

The 81mm vz.36 Mortar was one of the most modern weapons in the Czech inventory. With the introduction of it into the Czech equipment lists the infantry gained a very effective means of local fire support and was justifiably considered one of the best in its class worldwide.

Its design was based on the French Stokes-Brandt model although  the designers at Pilsen improved the weapon through several significant innovations. The vz.36 represented the first of a lengthy series of successful mortar designs that Pilsen-Skoda developed terminating in the 8.2cm vz.52 mortar which is still in service with the Czech Republic.

When construction engineer Frederick Wilfred Scott Stokes, working as a railway bridge designer, was unsuccessfully offering his British military armaments project to the British War Department at the start of WW1, he had no idea that his idea would fundamentally influence military arms development over the next century. Fortunately, despite the fact that the British military authorities were so short sighted, the Stokes mortar did not escape the attention of artillery experts around Europe. The British Armaments Commission took the step of recommending its introduction into the European armed forces despite their original negative opinion. 


Officers that had front line experience were immediately able to recognise the simplicity and genius of the design and pushed through its production. From 1915 the British army was supplied with the most advanced mortar system in the world, while other armies fighting against them were struggling to find a weapon that could even approach the Stokes mortar's effectiveness.

When the opening moves of the Great War were concluded the troops were hiding in ever increasing and improved trench systems. These trench lines could not easily be breached the war fell into an uneasy stalemate punctuated with projects of mass carnage. All sides therefore were desperately searching for some weapon that would be capable of destroying trenches, shelters and firing positions. As a result of this a number of various different types of mortars, bomb launchers, grenade launchers and mine throwers were created. 

The mortar had, by this time, already seen front line service in wartime. The first mortar had been invented and tested during the Russo-Japanese War of 1904-1905 and similar weapons had been introduced to virtually all fighting forces around the world. However they were mostly heavy weapons mounted on massive bearings, whose accuracy and effects were not in line with the mass of the weapon system in question, despite an often respectable character. 


Stokes design was therefore meant to completely revolutionise this field of arms development. The initial designs however were inflicted with a number of teething problems which took the rest of the war to completely resolve. The most serious of these problems being low accuracy and a lack of a decent tactical range. These problems were only really solved after the Great War with the collaboration of French military designer Brandt. Whilst still in his twenties he achieved the design of a stabilised mine as well as a new type of sighting system. Modified mortars with these new attachments and rounds were introduced into the French army under the designation Stokes-Brandt M.27 and subsequently after minor adjustments the Stokes-Brandt M.27/31.

This model of mortar became the base model of virtually all medium mortars throughout the interbellum.  These weapons were manufactured under license by countries such as the United States, the Soviet Union, Germany, Poland, Italy, Denmark, the Netherlands and of course France and the UK.

Almost as soon as the state was founded the Czechs had begun to address the issue of providing infantry formations with a close support weapon. Initially a series of small infantry guns, of often interesting designs, were tested in order to develop the so called Battalion Howitzers from Skoda. The final design of one of these howitzers was indeed a remarkable weapon but in order to provide versatility its sacrifice was in performance. 


Eventually after much testing, and under mounting pressure from the General Staff, the Ministry opted to provide the army with a mortar and an anti tank gun. The development of the mortar was, as was to be expected, entrusted to Skoda which on the advice of the Ministry obtained a license to produce the Stokes-Brandt mortar. However the weapon was not just taken without adjustment and the designers at Skoda designed several fundamental improvements. 

Work on the new model, designated B5, progressed quickly and the weapon was soon ready to conduct its tests by the military, along with its new types of ammunition. It passed its test with flying colours. The initial tests alone proved definitively that the new mortar exceeded the abilities of the 9cm vz.17 which was the current main infantry light support weapon. The test committee approved of the simplicity and reliability of construction. The mortars mobility, ease of operation and the relative cheapness of the weapon combined with its accuracy and effectiveness all contributed to its high ratings within military circles.

The mortar itself consisted of four principal parts. The barrel, the baseplate, the bipod and the sights. Compared to the French model the most significant adjustments were made to the bipod, which hereafter acquired the characteristic shape used on all other Skoda mortars. The baseplate was also subjected to minor modifications whilst the flaws with the sights were also addressed.

For transportation the mortar was mounted in a special frame that fixed individual parts of the mortars body to itself, whilst the whole frame was mounted onto a modified vz.24 horse drawn cart. The new version was designated 'vz.24/35'. This cart, with mortar mounted could also be drawn by motor vehicles. Over short distances the mortar was transported in its constituent parts along with emergency supplies of ammunition. 

Where the ammunition for the mortar is concerned the Defence Ministry instigated the development of two new basic types of round. These were termed light and heavy mines. The light rounds weighed in at 3.26 kg and were designed to be fired over open sights. The heavy rounds weighed in at 6.85 kg and were designed to be used at ranges of up to 1200 mtrs and were considered capable of destroying field positions. 


During the traditionally strict and difficult field tests by the troops, which took place on the shooting ranges at Hlbokem there was only a single issue encountered when using the new ammunition prior to its introduction into general use by the armed forces. The firing dispersal was considered too focused and the rounds failed to achieve the dispersal required by the military administration. Skoda attempted to address the issue but only achieved a slight improvement. They then worked on the problem with VTLU but, despite a number of attempts no appreciable improvements were achieved. Skoda eventually contested the tender claiming that the tender specifications were based around Brandst's rather whimsical advertising materials and were essentially unobtainable in a real world situation. The final attempt to rectify this, perhaps incorrectly perceived deficiency was conducted in December 1938. The Commission conceded the points, returned the mortar to the field test ranges and instead satisfied themselves with a range of smaller test and adjustments as the mortar was recognised as already meeting the lions share of the criteria set by the tender, and overwhelmingly met the strict requirements set by the military administration, in many cases even overcoming them, in one example actually achieving over 25 rounds fired in a minute. The test committee therefore proposed the introduction of Mortar B5 into the army's equipment rolls and which the Ministry subsequently introduced the new weapon under the designation 8cm Mortar vz.36.

In the summer of 1936 the Ministry of Defence issued an official order and a production authorisation. Despite the considerable workload which faced them, Skoda were still able to quickly prepare the production line in the Skoda plant and proceed with production. By the end of 1936 the first 123 mortars had left the production line and had been test fired at the new firing ranges at Nekmir, with the entire order being subsequently completed during 1937.

There is no definitive source that agrees on the numbers of these mortars produced during this time but general consensus is that the most quoted number is 902 pieces, which the army had in service by March 1939. The perceived war needs for this model mortar was set in 1938 as 951 pieces although by the end of 1938 a further 48 mortars were still on order so the likely total could be in the region of 950.

1-barrel, 2-butt barrel, 3-barrel gasket ring, 4-fuse, 6-screw fuse filler, 7-fuse gasket ring, 12-barrel butt plug, 13- firing pin, 14- bearings, 15-ball bearing pin, 16- bearing support, 17- bearing support, 18- bearing support reinforcement, 19- bearing grip hinge, 20- bearing grip, 21- leather grip cover, 22- collar, 23- collar cover, 24- shooting table, 25- pin collar bolt, 26- collar clamping bolt, 27- clamping bolt nut, 29- collar guide pin, 30- securing bolt to guide mandrel, 31- collar damping collar, 32- securing pin to guide mandrel, 33- securing bolt to collar guide mandrel nut

In early 1937 the new model mortars reached the first troops allocated to receive them. The first troops that received them were the technical organisations within the infantry regiments who had provisions of 9cm vz.17 mortars. From the end of 1935 infantry regiments had their technical support troops reorganised into weapons companies which included the mortar platoons, which on mobilisation would be expanded to a full company.

According to the mortar unit construction program a total of 110 mortar companies and 32 separate independent mortar units, intended for border guards and cyclist battalions, were to be built. Only 8 companies were fully motorised however, having been constructed to equip the newly established fast divisions along with a further 12 platoons.

In 1937 intensive training for the troops intended for service within these units was begun,. Above all however, were the unit commanders, who were specially selected infantry officers who had been put through special courses. The choice of these officers was by no means coincidental, as the prevailing view in the Ministry and the Military was that light mortars had to perform tasks solely for the benefit of the infantry, and therefore the officers in charge had to be perfectly acquainted with its needs and capabilities.

The intensive training courses for the mortar troops ended with the target shooting courses which also achieved good results despite the relatively short time-frame which this was conducted over, providing a strong indication of the quality of the weapon and level of capabilities of the Czechoslovak soldiery.

Along with the orders for the mortars that the Ministry placed, orders for ammunition was also placed, covering both new types of rounds that had been developed. 
pt-38-8- cm-m.jpg

The existing technology utilised a brass press for the body of the round but this was relatively expensive and the Defence Ministry insisted on the introduction of mosaic production practices which gave a greater chance of continuing supply of ammunition throughout conflict periods. Due to the now possible potentials for smaller production plants the ammunition shell casing was now to be produced by casting. During the firing tests conducted in the Spring of 1938 however it was found that the ballistic properties of rounds produced in this fashion had been changed resulting in a requirement of a brass plate with the new firing characteristics of the ammunition attached to the mortar containing the modified firing table.

Despite the fact that the full system of mosaic production was never realised by March 1937 a total of 343,697 rounds of both types had still been delivered. It should also be noted here that the development of both smoke and incendiary rounds was also being conducted by Skoda but never reached completion. This is an important point because the Slovak mortar platoons went to war without any smoke or incendiary shells and had to support the infantry with nothing more than HE shells. 

Through the critical days of the September 1938 crisis, the Czechoslovakian Army was equipped with an appreciable number of these mortars but chiefly in the front line units. Those units formed or completed during mobilisation unfortunately never received any and in any case there was a lack of qualified troops capable of using these new weapons in these units.

When the schism came and the Slovaks declared their independence the Wehrmacht was able to lay their grubby paws on over 600 mortars which were essentially based on the same pattern as the existing 8cm granatwerfer 34 which was already serving in the Germany army. The Czech mortars entered service as the Granatwerfer 36(t) of which the Germans had 514 pieces in service at the start of the war along with at least 236,500 rounds of both designs.


According to existing documentation covering the confiscation of hardware that was left on Slovak soil over 300 of these mortars apparently remained for use by the Slovaks, although however only 150 were reported as usable by the Slovak authorities and as such it seems likely that the Germans had claimed over 600 units.

Of these numbers however, the numbers actually allocated to the front line troops never approached anywhere near this number.

At the conclusion of the Polish campaign, on 27th September 1939 the returns of the field units indicate that the 1st Division had 10 on its rolls, the 2nd Division had 20 whilst the 3rd Division had 16. The Rapid Group that went over the border had an allocation of only two attached to its motorised infantry battalion. These numbers indicate a total of 48 of 150 mortars deployed with front line units.

The Rapid Group that crossed the Polish border in September had an allocation of two of these mortars for its single motorised infantry battalion and if we extrapolate this number of mortars to each infantry battalion in the Slovak army the number roughly match up, except with the 1st Division having just over half of its establishment provision. This seems to be a number that can be carried forwards through the Slovak involvement on the Eastern Front, except for the Rapid formations whose provision steadily increased until its destruction in the Crimea in 1943.

On the 26th June 1941 the Slovak Expeditionary Group had only 36 Skoda 8cm vz.36's allocated to it, although it is possible that this number increased to reach the required wartime strengths.


The Rapid Group, on crossing the border had no allocation of mortars according to the returns of 25th June 1941. On its transformation to the Rapid Brigade the returns of 8th July 1941 indicate a provision of two, which would seem to fit with the idea of two mortars per battalion. On expansion to the Rapid Division where a single battalion essentially became four battalions (I/20 & II/20 and I/21 & II/21), it can be seen on the returns of 22nd August 1941 that a complement of 22 mortars had been provided, which would seem to indicate a provision of four mortars per battalion with a couple held back as spares. Through 1942 and as indicated by a number of returns across various dates a provision of 24 mortars was present indicating either there was a now a provision of either four mortars per battalion with spares or it was now six per battalion but no spares unless added to through war spoils. At the start of 1943  it would seem that the Rapid Division had an allocation of 32 mortars although by the 2nd March 1943 following the collapse in the Crimea and the loss of all of its heavy materials the Division had only a single mortar left on its rolls.

The other major Slovak field formation; the Security Division's returns tell a similar story.

When the Slovak field army crossed the border in July 1941 it included the 1st and 2nd Divisions. Each of these comprised three regiments of two battalions each. six battalions! Each of these divisions had a provision of 18 mortars indicating a possible provision of three mortars per battalion

As soon as the Field Army had been split and reorganised into the Fast and Security Divisions' the Security Division also had a complement of two regiments (101 and 102) comprising a total of 4 infantry battalions. Through 1942 there was a steady complement of 25 mortars in the Security Division which rose to 31 by July 1943.

Following the collapse of the Slovak forces in the Crimea the Security Division was kept in the field for a while longer but morale had collapsed and they were eventually redistributed as labour divisions helping to build the defences of the Reich.

These mortars can be seen to have participated in almost all of the battles that the Slovak field forces contributed to, especially the campaign in Russia.The numbers of these mortars steadily increased over time right up until they were all either lost in the Crimea or handed over to the German Wehrmacht.

In the second half of their involvement however the Slovaks also had to deal with a thinning munitions supply as the facilities producing the ammunition had stopped production so other measures had to be found. What can be said however is that wherever this mortar was to be found the Slovak infantry were sure that they had an angel on their shoulder looking out for them.

So that's a snap shot of the history so now lets take you through how I put them all together...


Before we go any further I should point out that every single miniature in this company was a Battlefront 15mm Romanian until I nipped off their heads and replaced them with Peter Pig heads to turn them into Slovaks. Either the ones with the Slovak Helmets that Martin sculpted for me or else the ones with the Soviet Pilotka Caps which fulfil a good proxy for the Slovak field caps.

I should also point out that the trucks will be dealt with in another post and that due to the easy availability I opted to use the Battlefront Polish Mortars for all of my teams.

So, where painting all of the infantry is concerned its a relatively simple affair. They are done the way that I do them to look good from about 5ft away. Scrutinise them from up close and all of the flaws in the painting will probably kick you in the cubes but from an arms length away they look splendid!(even if I do say so myself!).


The first step is to prime the miniatures, and as with most of my other historical stuff, I prime with a black etch primer. You can buy these from any hardware store but the 'etch' in the primer ensures an exceptionally strong substrate for the acrylic layers that will go over the top, the etch actually referring to a dilute acidic content that eats microscopically into the surface of the model creating an uneven surface for the paint to clutch to whilst providing a nice and smooth top layer as the paint levels out and dries.

The lions share of the work done on WW2 miniatures is the main uniform and where the Slovaks are concerned after a somewhat lengthy research period I decided to ditch the (re)coloured photos from the past and go with the uniform colours that all of the re-enactors in Czechoslovakia are using at the moment. In my experience all of these re-enactment guys are anal about accuracy so I would trust their opinions a lot more than raggedy old photos with amateur enthusiast recolour treatments.

My base coat was done with Vallejo's 887 Brown Violet for the deepest layers of the uniform. The first highlight, which presents the largest overall surface area that will be seen at the end was done with MIG's 113 Khaki Green No3 (Brit 1939-1942) with the final highlights along all of the raised edges being completed with MIG's 058 Light Green Khaki. This covers all of the cloth uniform and the puttees.


The helmet has a single coat of 50/50 mix of Vallejo's 897 Bronze Green and Vallejo's 887 Brown Violet with the blue helmet band having a basecoat of Vallejo's 925 Intense Blue, highlighted with a 50/50 mix of Vallejo's 925 Intense Blue and Vallejo's 943 Blue Grey. The little Slovak crosses are all hand painted with thinned down Vallejo's 820 Offwhite.

Everything else has jam on both sides after painting the uniform.

All of the Canvas bags and straps have a basecoat of Vallejo's 921 English Uniform applied with block highlights of AK Interactives 3072 M-44 Uniform Green Ochre Khaki whilst the leather belts and ammo pouches are basecoated in Vallejo's 045 Charred Brown and highlighted with Vallejo's 983 Flat Earth.

The boots are any matt black whilst the Gas Mask Tins are basecoated with Vallejo's 980 Black Green and highlighted with Lifecolor's UA224 Olive Drab Faded Type 2.

The rifle bodies are basecoated with Vallejo's 826 German Camo Medium Brown with the highlighted grain lines painted with Vallejo's 981 Orange Brown. All metal work is painted black firstly and highlighted with Molten Metals Steel. The rifle straps are basecoated with Vallejo's 880 Khaki Grey and highlighted with a 50/50 mix of Vallejo's 880 Khaki Grey and Vallejo's 819 Iraqi Sand.

Where the skin is concerned you can paint it how you please but personally I use one of AK Interactive's paint sets for 'Flesh and Skin Colours' and I've never looked back!


All of the bases are actually really simple. I buy all of my bases from Tony at East Riding Miniatures. Hes a bit of a legend and REALLY helpful. They are all laser cut MDF which allows for easy scoring of the base surface to enhance the grout adhesion.

I then glue the miniatures to the scored surface and apply a thin layer of tile grout over the top. Once this is dry I glue a layer of one of my sand mixes over the top. Generally speaking I create my own mixes for base coverings as I REALLY don't like a lot of the crap you buy from the shops. Its generally speaking far too gaudy in colour or uniform in texture for my tastes.

I like the generally fine sand BUT I like to have lots of the little stones in there so I can create some colour contrasts with the dirt on the bases.


Once dry the whole base is given a basecoat of Vallejo's 826 German Camo Medium Brown and given a heavy drybrush of Vallejo's 814 Green Ochre.

All of the little stones on the bases are then given a basecoat of Vallejo's 995 German Grey and roughly highlighted (to create a jagged uneven texture) with any lighter grey of your choice but personally I go with Vallejo's 992 Neutral Grey.

The sides of the bases are now painted Matt Black. I never used to bother with this BUT I've really gotten into the clean precise look this lends to the bases. I love it now.


Now we come to the final stages of the bases which is the covering. The static flock that I use is my own mix. I go for something that approximates the dead and dry grass you find on the Steppes with perhaps a little more green in it than usual. This allows an overall base aesthetic that can be used the length of Europe in my opinion.

To provide the final textural boost to the bases though I use a variety of clumps. I had a LOT of problems finding ones that I felt were suitable but after a couple of years I came across a company called Tajima Miniatures whose self adhesive tufts are without a doubt the best I have ever found. I use their stuff by the bucket load now, in great variety. 

These all add to the final colour and texture of the bases of this army.

...and there we have it. Once more we reach the end of another post about guys in green with tubes, bombs... and BAYONETS!!!!

Monday, 9 December 2019

FoW: Slovak Armour (LT vz.35 tanks)

Finally we have reached that part of our Slovakian odyssey that was such a draw for me in the first place; the funky armour with its funky colours! The Skoda CKD LT vz.35 light tank.


Now there are those out there that will claim that this tank was no less than the best tank in the world when it rolled off of the production lines, and whilst I may categorically disagree with this claim it is a matter of historical record that this tank was good enough early in the war to comprise almost the entire armour park of the Slovakian army, took centre stage in the Romanian and Bulgarian armoured services, provided the base model for the Hungarian Turan II and III and formed almost 10% of the total German tank strength being seen as a good proxy for the Panzer III until such times as German manufacturing could meet the Heers needs.

A total of 434 of these tanks were built by Skoda by the time the Reich had occupied Czechoslovakia and production ceased. The Germans immediately appropriated 244 of them in March 1939. 

When Slovakia were pushed into declaring their independence they were able to retain the 52 LT vz.35's that were a part of the incomplete 3rd Fast Division.

It was constructed with a framework of steel 'angle iron' beams onto which armoured plates were riveted. A 4mm firewall separated the engine block from the crew compartment and the engine block also allowed access via a number of mesh coverings which also served to assist in keeping the engine cool. The engine also assisted the general cooling of the vehicle by drawing air through the commanders cupola.


This was an advantageous feature insofar as dispersing gunfire combustion fumes but also proved to be problematic in that the draft generated by the engine would only serve to exacerbate the freezing weather conditions and there was an increased risk of engine fires reaching the crew compartment. The noise of the engine and the heat that it gave off also appreciably affected the crews fatigue levels.

The driver sat on the right hand side of the crew compartment using a 15.4 in by 3.5 in vision port protected by 2.0 in of bulletproof glass. 

Communication with the driver was via a three coloured light system. The radio operator sat to the left of the driver using a vision port with a 5.9 in by 3.0 in slit using the same protection as the drivers. The radios were mounted on the left hand wall of the crew compartment whilst the hull machine gun was mounted in a ball mount with 30 deg traverse, 25 deg elevation and 10 deg depression. Most of the barrel protruded from the ball mount although the ball and body were protected by an armoured trough. The ball mount had an integrated spotting scope although if a hull plug was removed it could be fired over open sites as well. If it became necessary the driver himself could lock the machine gun in position and fire it himself by using a 'Bowden Cable'. 

One weak spot however was the drivers access hatch which stood proud of the hull and could be damaged by incoming fire.

The turret ring had a relatively tight diameter of only 49.9 inches. The turret itself had a flat frontal face in the centre of which was mounted the 37mm main armament to the right of which was another 7.92mm machine gun in another ball mount.


The commander had four episcopes in his cupola and a monocular mirror with a periscope which the commander could extend once he had removed its armoured cover in the vehicles hatch, to give vision whilst 'buttoned up'.

The tanks 8.62 litre Skoda T-11/0 four cylinder, water cooled engine produced 120 horsepower at 1,800 rpm. Two fuel tanks were fitted, the main tank with a capacity of 124 litres on the left hand side of the engine and the auxiliary tank, carrying a further 29 litres on the other side. The engine was capable of running on gasoline, an alcohol-gasoline mixture and 'Dynalkohol'; an alcohol benzine mixture.

The engine was mounted in the rear alongside the six speed transmission which drove the rear mounted drive sprockets. The tanks suspension originated with the Vickers 6-Ton tank, eight small pairs of road wheels on four bogie assemblies per side with each pair of bogies sprung with a single leaf spring, a front idler wheel and four track return wheels. An unsprung road wheel was located directly underneath the idler wheel to improve obstacle crossing.

The transmission, brakes and steering were all mechanically assisted using compressed air, reducing driver fatigue. This feature proved problematic in the extreme environmental conditions of the Eastern Front.


The main armament was a Skoda UV vz.34 gun with a pepperpot muzzle brake and a prominent armoured recoil cylinder above the barrel designated A3 by Skoda. It fired a 0.815 kg armour piercing shell at 690 m/s. At a 30 deg inclination the AP round could penetrate 37mm at 100m, 31mm at 500m, 26mm at 1000m and 22mm at 1500m. Kliment and Francev recorded a penetrative ability of 45mm of vertical plate at 500mm.

The machine guns ball mount could be either coupled to the main gun or operated independently. Both weapons could elevate 25 deg and depress by 10 deg. Initially the tanks were supplied with the Zbrojovka Brno ZB vz.35 machine guns although in 1938 they were all exchanged for the more modern ZB vz.37's (commonly known in British armoured circles as the Besa HMG).

The tank was equipped with 78 rounds of ammunition (24 AP and 54 HE) along with 2700 rounds of HMG ammunition.

The gun mantle had an armour thickness of 25mm which was concurrent with the thickness of all other frontal armour across the vehicle. The sides and rear areas were almost all 16mm thick although the Hull rear had 19mm of armour and the turret side had only 15mm.


When the Germans forced the Slovaks to declare their independence the nascent, and vastly understrength 3rd Fast Division was stationed within Slovakian borders although its strength was much depleted due to the exodus of the Czechs serving in the 3rd and its assets were garrisoned around Slovakia and not concentrated at any one point.

The Division had started to receive its new LT vz.35's as early as September 1937 just after establishment and by March 1939 had received 52 of them although when Germany annexed the Czech rump nine of the tanks were in Pilsen for repairs. The Germans immediately confiscated these and transferred them to Paderborn to become a part of Panzer Regiment 11. However, very soon after the loss of these nine vehicles a further nine were secured by transfer from the 2nd Armoured Regiment.

These nine vehicles had fought against the Hungarians in Transcarpathian Ruthenia and after the latter was occupied these vehicles had retreated into Slovakia where the authorities confiscated them and subsequently handed them to the 3rd Armoured Regiment as replacements.

Following the return home of the Czech manpower from the 3rd Fast Division, the Slovaks were left with all of the equipment but hardly any qualified staff to man and repair it. The senior remaining officer was Staff Captain Cani who was instructed by the Defence Ministry to reform what was left into an armoured battalion. On 28 April 1939 he submitted his organisational proposal to the ministry for the battalion which was to include two tank companies of LT vz.35's. Due to the manpower shortages however he was forced to request a further 288 men who had some mechanical experience.


The Ministry gave the green light! Army headquarters instructed Infantry Regiments 1-5 to provide the requisite manpower that Cani needed.

By 6 July 1939 Cani had received most of his personnel draft but was forced to complain bitterly that only 28% of the provided manpower had any mechanical experience at all. Some units had even attempted to pass him illiterate soldiers, and even gypsies which he unceremoniously refused.

The battalion was renamed 'Martin', after the home base it was stationed in and started to repair, reorganise and train its staff and equipment. With regards to the repair and maintenance of the tanks Cani was forced to request that Skoda assigned some qualified mechanics to help the new mechanical staff to master the complicated systems of the LT vz.35's.

Skoda dispatched four mechanics who had the entire vehicle park up and running in no time!


In the autumn of 1939 after the limited exposure during the Polish campaign, the battalion was reorganised again, this time having its armoured complement expanded from two to three companies of LT vz.35's with the third company serving as a 'reserves' company. Additional reinforcements meant that the battalion now, once again, became an armoured regiment.

At this time however there were some organisational complications as the battalions had been farmed out in support of the infantry divisions whilst the armoured cars had been attached to the cavalry. This situation ended in May 1940 when all mechanical assets were once again collected together under the regimental umbrella.

At this time the low level organisational structure of the regiment was changed from the old Czech structure to fall in line with German tactical doctrine with the numbers of platoons in a company changing from three to five, although the strength within the platoons went down from five tanks to three. The overall strength therefore did not change but the tactical flexibility did. The strength of the company remained the same at 16 tanks. Five platoons of three and one command vehicle.

This changed in 1941 to 19 vehicles with the addition of a commanders group of three tanks.


As early as September 1939 the Defence Ministry inquired of Skoda about the purchase of a further ten tanks but Germany sat on the permission until April 1940 by which time production of the LT vz.35's had ceased and the Ministry had to look elsewhere.

Through 1940 the regiment was training under peacetime conditions and the tank drivers were first taught in tankettes, then progressing to the obsolete LT vz.34's before finally graduating to the LT vz.35's. The regimental testing track was in nearby Bukovina, live firing was carried out on the ranges at Oremov Laz. The regiment was also providing details for parades in areas such as Bratislava, Michalovce, Banska Bystrica and Martin.

On one occasion they even had to provide a detail of four LT vz.35's to assist in suppressing a miners strike in Handlova in late 1940. Thankfully this was quelled peacefully before the armoured assets even arrived on site.

From January 1941 there was another new organisation with all three armoured companies being collected into their own battalion.


When Germany invaded the Soviet Union the Slovaks sent a combined group of 47 tanks over the border as a part of Brigade Pilfousek a.k.a The Mobile Brigade. Of these 47 tanks 30 were LT vz.35's. At this time the tanks really proved their worth and despite the mountain of technical obstacles that needed to be overcome it seems that by July 1941 these issues had all been resolved and the tanks were running true.

Within the ranks of the Slovak field army at this time however were many officers with very strong anti fascist sympathies who from the beginning had strong connections back home with the nationalist  underground. They were strongly of the opinion that the tanks would be better served at home in preparation for an uprising against the regime rather than being frittered away on the Eastern Front serving Nazi Germany. For these reasons members of the 1st Tank Company were able to sabotage the engines of three of their tanks and have them shipped home.

In the meantime the Mobile Group was steaming ahead, having lost a single LT vz.35 which plunged off of a bridge at Wojtovka. The crew did manage to survive however. A further ten LT vz.35's had to be left behind due to mechanical failures or sabotage. All of these ended up being shipped back to Slovakia for extensive repairs.

The Mobile Brigade was reorganised on 8 July 1941 with its tank battalion now being named 'Diamant' and containing twenty LT vz.35's out of a total of thirty six tanks. A further seven  LT vz.35's were assigned to Diamant from the Field Army's former Tank Company 11 for a total of  forty three tanks.


During the battle for Lipovec, the Mobile Brigades first real contact with the enemy they lost their first LT vz.35 to a mine, abandoning it to the Red Army who destroyed it during their night retreat. Another LT vz.35 got bogged down and had to be abandoned by its crew. This was also destroyed by the Soviets during the night and they lost a third LT vz.35 during their retrograde movement from Lipovec.

The fighting within Lipovec proper was a stiff fought affair however and a further five LT vz.35's suffered heavy damage in the close quarter fighting.

The tank repair shop under Lieutenant Herha was a part of the conspiracy to preserve the nations armoured vehicles. Though perfectly capable of repairing the vehicles in the field, Lieutenant Herha, in collusion with the regiments commander Major Dobrotka, managed to persuade the Mobile Brigades headquarters, and even a German commission that all of the vehicles had to be returned to Slovakia to have repairs conducted there.

After the return of the vehicles to Turciansky sv.Martin the Armoured Regiment started to conduct its repairs which due to the reasons already mentioned progressed exceptionally slowly...


On 23 July 1941 General Catlos decided to reorganise all Slovak field forces into a Mobile Division and a Security Division. The Security Division never had any LT vz.35's assigned to it and by the time of the establishment of the Mobile Division all of the armoured assets had been shipped back to Slovakia.

By January 1942 the regiment still had a great many of its armoured vehicles out of commission. Out of forty nine LT vz.35's only seven were serviceable and capable of being in the field. Obviously the accuracy of the term 'out of commission' where these vehicles were concerned was extremely liberal with the majority within the abilities of the mechanical engineering teams to repair in the field, let alone at a home servicing depot.

By the time of the Soviet offensive of January 1943 the Mobile Division still had no LT vz.35's assigned to it only having been assigned two platoons of LT vz.38's and LT vz.40's. Only one of these vehicles survived the retreat to the Crimea and eventually found its way back to Slovakia.

The Slovakian LT vz.35's did see some limited action within the National Uprising but apart from that their story has pretty much run its course so lets now turn our attention to how we go about painting these little beauties.


The first thing that I do on any of my vehicles is always the green base colour.

The main paint scheme for these tanks is done by airbrush using my MIG Aircobra for the Priming and Basecoating and my Harder & Steenbeck for all of the shading and highlighting as my H&S has a 0.15 needle and provides a hell of a lot more control... but the MIG is SOOOOO easy to clean it just makes sense to use it where I can...

The Airbrushing steps are as follows:
i) The model is primed with a Matt Black Etch Primer
ii) The basecoat is Tamiya's XF-58's Olive Green
iii) The first highlight is LifeColors UA221 Khaki Olive Drab applied in a panel highlight fashion
iv) The second highlight is LifeColors UA224 Olive Drab Faded Type 2 applied as above but a bit lighter and gathered in along the edges and prominent areas
v) The third highlight is a 50/50 mix of LifeColors UA224 Olive Drab Faded Type 2 with LifeColor 01 White. This is applied sparingly just along the edges and prominent areas.


So that's the airbrushing complete and don't be overly concerned if your third highlight was too heavy as the next two steps will, if done correctly, tone the whole contrasted effect down.

vi) The next step is to apply the colour swatches over the body of the vehicle that will provide the camouflage pattern. With the green camouflage base now finished off I add swatches of Vallejo's 914 Green Ochre and Vallejo's 826 German Camo Med. Brown to leave an equal balance of all three colours in an intentionally smoothed edge blotted pattern.
vii) Now we apply the Filter over the whole thing to unify the colour aesthetic and clip the contrast a little. I apply MIG's Filter 1506 Brown for Dark Green.
viii) Once dry wipe of any serious excess from where it may have pooled but otherwise leave it untouched.
ix) At this point I apply the first layer of Varnish. It doesn't matter which varnish you choose so long as it fixes the Filter layer to the miniature as its an oil based layer.

Once the varnish is dry its time for the next layer which is where the real depth starts to come out.


x) Over every detail laden part of the model apply a Wash. I use AK Interactives Wash 075 Wash for NATO Camouflage Vehicles. Don't be shy with this step. Slap it on aplenty! Then leave to dry for a while.
xi) Once its dry (or dry-ish) use cotton buds (cue tips for you Yankees out there...) and use a gentle white spirit to wipe away the excess leaving great detail and shadowing around all of your detail areas and a general lowering of the overall luminosity. Personally I use Winsor & Newtons Artists White Spirit as I had a bad experience with normal white spirit stripping away four layers of paint and primer and have no wish to repeat the disaster!
xii) Once the whole piece is dry to the touch apply another layer of varnish to fix everything in place.
xiii) The last thing to do with paint (if you want to; I chose to omit this step with these tanks as I like the camo scheme too much to just cover it all up with mud!) is to lightly airbrush a layer of Vallejo's 826 German Camo Medium Brown across the wheels and the lower third of the vehicle. This layer has a highlight of Vallejo's 914 Green Ochre mixed in whatever ratio you want with the German Camo Medium Brown already in the airbrush and is then applied in splotches to provide some variance in the muddy weathering.
xiv) A final varnishing is applied to the vehicle which are then finally fixed to their bases.
xv) ...and so we come to the very last thing that I needed to do for these Slovak additions... the decals.


Now, I am capable of making my own decals BUT the experience that I have had so far has led to decals that are uncomfortably thick and ones that cannot include white unless as an overall substrate to the total image and so one of my Polish friends suggested I approach a gentleman in Poland that both he and his father had used to produce specialist decals.


I thus contracted one Bogdan Zolnierowicz through Facebook to produce for me a decal sheet with enough Slovak aircraft and tank markings to polish off everything that I thought I would need. Along with a couple of sheets of numbers and letters I had enough to produce the exact representation that I wanted and Bogdan's decals were exactly what the doctor ordered.


Incidentally if you want to approach Bogdan for help with decals he says you are all welcome to do so. He may not respond quickly but he will eventually and he is the only one on Facebook with the name.

He knocked out a sheet with a stack of tiny Slovak crosses for me which duly made it to the turrets of these armoured vehicles.

So there we have it ladies and gents. Another mini project finished and one (read twelve) more items to place onto the table alongside the rest of my Slovak Mobile forces

Onwards and Upwards!

Fix bayonets!

Sunday, 8 December 2019

FoW: Slovak Artillery - Skoda 10.5cm vz.35 battery

Today I would like to introduce you to what was the most cutting edge piece of artillery in the Slovakian arsenal at the start of the war. Designed purely for motor traction, and used almost exclusively by the elite mobile groups at the start of the conflict, this gun really stood the test of time... if only they had more of them eh?!?!?!?

Ladies and Gents; I give you the Skoda 10.5cm vz.35 Light Howitzer!!!!


The most modern of Slovakia's artillery pieces that they were able to field was the Skoda 10.5cm vz.35 heavy artillery piece... and as can be expected it was a piece that was inherited from the Czechoslovakian artillery park.

At the time of its creation this remarkable cannon was undoubtedly one of, if not THE best cannons in its weight category anywhere across the globe. The birth of this formidable weapon was, however, plagued with problems and it took almost ten years from the release of the requirement specifications from the Czechoslovakian Defence Ministry, to be realised.


This cannon had no competition at all when entered into the Czech equipment lists and was advanced enough before the way to influence the construction of medium artillery pieces well into the post war period. The cannon was officially entered into the Czechoslovakian equipment rolls as the 10.5cm hruby kanon vzor 1935 in December 1935.

This gun was designed solely for motor traction which was still unusual for the day and included a whole raft of advanced features.

The gun weighed in at just over 4 tonnes, had a muzzel velocity of 730m/sec, fired HE, Cannister and AT and was designed to be able to fire at the enemy over open sites as a part of its perceived anti tank role on the battlefield.


In 1937 Skoda delivered the first 36 completed to the army, and production continued unabated. 

In March 1939 the Wehrmacht took over the Czechoslovakian Armaments Technical Office in Pilsen appropriating 66 of the existing 107 pieces from the Czech army. Of the remaining weapons, 36 from this extant park remained in Slovakia and was introduced into the nascent Slovakian artillery regiments, whilst the Germans took a further delivery of another 36 pieces.

The Germans ended up with more than a hundred pieces of this weapon, serving primarily through the Battle of France and during the invasion of the Soviet Union, throughout the combat on the Eastern Front.


When the Slovaks first reorganised their artillery regiments in the Summer of 1939 the 10.5cm vz.35's were all allocated to Artillery Regiment 51 with its first battalion receiving four batteries of four guns each and the reserve battalion receiving a single battery of a further four guns.

The artillery reorganisations were complete by late 1940 with all of the 10.5cm vz.35's being allocated to Artillery Regiment 11, as the armys only completely motorised artillery regiment, with a wartime strength of 27 of the 10.5cm vz.35's, This strength obviously fluctuated and in March 1942 Artillery Regiment 11 had only one battery of three of these guns on its rolls although by March 1943 this number had climbed although still there were only 16 on the rolls, although the German 10.5cm leFH.18 had started to arrive.

When the Slovak Mobile Group crossed the Soviet border on 8 July 1941 it took with it only the first battalion of Artillery Regiment 11 augmented by a single battery of four of these guns.


On 12 July 1941 the first battalion was bumped up to the entirety of AR11 with its constituent three batteries of 10.5cm vz.35, a total of twelve guns.

At the beginning of August 1941 AR11 was reduced to one light battalion and one combined battalion only with a single battery of these guns, the rest being pulled back to Slovakia and into reserve.

The Mobile Division was formed at the end of August 1940 and once again AR11 took the field in full strength as it had been in the Mobile Brigade in the previous month.


Owing to the problems that the Slovak Fast Division was experiencing the artillery was again reorganised in June 1942 as a result of the decision to rearm with German artillery pieces taken in March. Of the 24 pieces which arrived, all but four were sent straight to the front where they supplanted all but one battery in the first battalion left with the 10.5cm vz.35's.

In the chaotic withdrawal from the Kerch into the Crimea in February 1943 the Fast Division lost almost all of its artillery but significantly did not lose a single 10.5cm vz.35, instead handing over the remaining five pieces to allied German and Romanian troops instead. 


Following the loss of all of the Security Divisions artillery pieces during the Soviet counterattack around Kharkov in 1942, the Slovak government made an attempt at re-equipping it and a small complement of two 10.5cm vz.35's found their way into the complement. By October 1943 however the Security Division had collapsing morale and had been reassigned as a Construction Division in Italy. 

When the Fast Division was rebuilt in the Crimea in April 1943 more artillery was again assigned to them with a total of only three batteries, the first being a half battery of two 10.5cm vz.35's only.

The personnel of Artillery Regiment 31 were eventually amalgamated with those of Artillery Regiment 11  with 1st battalion's 3rd battery only remaining equipped with the 10.5cm vz.35.


Following further retreats across the sandy terrain in October 1943 the artillery regiment lost all but two of its German guns in the soft sands to Soviet armoured attacks. No further examples of the 10.5cm vz.35's were allocated to the Slovak field army and their Slovakian front line adventure comes to an end here.

However the story of this weapon did not terminate here. The Slovaks were able to rebuild their forces following the 1943 disasters and a further 28 10.5cm vz.35's were allocated to the newly rebuilt AR11 with a further three being assigned to the Army Headquarters although none of these allocations made it to the front before the Uprising began.

During the Slovak uprising in 1944 the Slovak insurgents were known to have fielded a couple of batteries of this weapon around their defensive line Grun-Kosariska-Janosikovo-Panosina although all would have been lost to the Germans in their retreats and eventual collapse.


In other areas of use their could have been an extensive export market for this weapon but for the Nazi invasion of Czechoslovakia. In 1935 Yugoslavia and Lithuania had placed orders for 24 cannon. 20 had been produced before the Nazi's confiscated the order in 1940. Interest was also shown by the Dutch and the Soviet Union although both trade negotiations failed due to the outbreak of hostilities.

As a final hurrah, after the war ended and the Czechoslovakian state was reformed a number of these guns found their way back into service and continuing to serve well into the Fifties.

So there we have it. A short potted history of one of the best guns in Axis service throughout the Second World War... now lets see how we can put a battery of these together ourselves... as nobody makes them...


So these particular miniatures use Battlefronts, currently out of production, RO585 Romanian Schneider 105mm M36  guns. Two blisters of two guns for a complete battery.

The first step is the take the gun shields and completely file away any detail. The bottom end of the shield fork that sits over the barrel need to be rolled over a 10mm diameter pen to a 45 degree angle.

Once this is done an observation flap is constructed for the top right of the shield. This consists of a square of very thin plastic card measuring 3mm x 3mm. This has two 1mm lengths of plastic rod glued alongside the top and bottom of the right edge of the flap to replicate the hinges on the front face of the shield.


I also filed away a lot of the detail on each leg of the split trail as well as well as filing off the muzzle brake as the Skoda weapon had a smooth barrel with no muzzle brake apparent.

DO NOT GLUE THE WHEELS ON YET! This gun had some pretty advanced suspension technology applied to its construction.


Unfortunately I did not photograph the process that I went through when I constructed the suspension and chassis frame for this gun so I'll just try to talk you through it.

So in between each wheel and the chassis proper is the addition of a new spring suspension mechanism. I manufactured this around a 1mm diameter brass rod 13mm in length. This rod is bracketed above and below by a concave arc of plastic 1.5mm thick with each end of the arc having flat 'feet'. If you imagine the profile of a thick shallow clay bowl with Really thick walls this could be a good approximation. These sections each need to be 15mm long. The rod fits in the middle of these two which are put together feet to feet with the arc of each length creating an oval central hole with squared off ends (in which the rod sits).

These are left to dry for a while and are then glued horizontally between chassis and wheel.

 Once set in place they each have a small brass hook created out of thin brass rod and glued into the frontal edge to create the tow hooks.

Along the front edge of the chassis are now two parallel lengths of white metal. A thin plastic disc with a 3mm diameter is glued centrally bridging both lengths whilst two smaller discs the width of each horizontal length (1mm) are then glued one on either side of the central disc half way along each lower length of white metal.


...and there you have it! Your very own Skoda 10.5cm vz.35 artillery piece. The most advanced artillery piece in the Slovak arsenal...

Now go make three more!!!


So there we have it. Above is an example of a completely painted battery of these beauties! I will take you through the painting colour schemes and methodology that I employ as well. A bit complex but personally I love the results so I'm happy with what I've got :)

Before we go any further I should also point out that every single miniature in this battery was a Battlefront 15mm Romanian until I nipped off their heads and replaced them with Peter Pig heads to turn them into Slovaks. Either the ones with the Slovak Helmets that Martin sculpted for me or else the ones with the Soviet Pilotka Caps.


The first thing that I normally do when putting together a battery once the guns are built is actually to actually paint all of the crew that serve the guns and where my Slovaks are concerned this obviously took a bit of work so let me take you through it all!

So, where painting all of the infantry is concerned its a relatively simple affair. They are done the way that I do them to look good from about 5ft away. Scrutinise them from up close and all of the flaws in the painting will probably slap you in the face.


The first step is to prime, and as with most of my other historical stuff, I prime with a black etch primer. You can buy these from any hardware store but the 'etch' in the primer ensures an exceptionally strong substrate to the acrylic layers that will go over the top.

The lions share of the work done on WW2 miniatures is the main uniform and where the Slovaks are concerned after a somewhat lengthy research period I decided to ditch the colour photos from the past and go with the uniform colours that all of the re-enactors in Czechoslovakia are using at the moment. In my experience all of these re-enactment guys are anal about accuracy so I would trust their opinions a lot more than raggedy old photos.


My base coat was done with Vallejo's 887 Brown Violet for the deepest layers of the uniform. The first highlight, which presents the largest overall surface area that will be seen at the end was done with MIG's 113 Khaki Green No3 (Brit 1939-1942) with the final highlights along all of the raised edges being completed with MIG's 058 Light Green Khaki. This covers all of the cloth uniform and the puttees.

The helmet has a single coat of 50/50 mix of Vallejo's 897 Bronze Green and Vallejo's 887 Brown Violet with the blue helmet band having a basecoat of Vallejo's 925 Intense Blue, highlighted with a 50/50 mix of Vallejo's 925 Intense Blue and Vallejo's 943 Blue Grey. The little Slovak crosses are all hand painted with thinned down Vallejo's 820 Offwhite.

Everything else is relatively quick and simple after painting the uniform.


All of the Canvas bags and straps have a basecoat of Vallejo's 921 English Uniform applied with block highlights of AK Interactives 3072 M-44 Uniform Green Ochre Khaki whilst the leather belts and ammo pouches are basecoated in Vallejo's 045 Charred Brown and highlighted with Vallejo's 983 Flat Earth.

The boots are any matt black whilst the Gas Mask Tins are basecoated with Vallejo's 980 Black Green and highlighted with Lifecolor's UA224 Olive Drab Faded Type 2.


The rifle bodies are basecoated with Vallejo's 826 German Camo Medium Brown with the highlighted grain lines painted with Vallejo's 981 Orange Brown. All metal work is painted black firstly and highlighted with Molten Metals Steel. The rifle straps are basecoated with Vallejo's 880 Khaki Grey and highlighted with a 50/50 mix of Vallejo's 880 Khaki Grey and Vallejo's 819 Iraqi Sand.

Where the skin is concerned you can paint it how you please but personally I use one of AK Interactive's paint sets for 'Flesh and Skin Colours' and I've never looked back!


All of the bases are actually really simple. I buy all of my bases from Tony at East Riding Miniatures. Hes a bit of a legend and REALLY helpful. They are all laser cut MDF which allows for easy scoring of the base surface.

I then glue the miniatures to the scored surface and apply a thin layer of tile grout over the top. Once this is dry I glue a layer of one of my sand mixes over the top. Generally speaking I create my own mixes for base coverings as I REALLY don't like a lot of the crap you buy from the shops. Its generally speaking far too gaudy in colour or uniform in texture for my tastes.


I like the generally fine sand BUT I like to have lots of the little stones in there so I can create some colour contrasts with the dirt on the bases.

Once dry the whole base is given a basecoat of Vallejo's 826 German Camo Medium Brown and given a heavy drybrush of Vallejo's 814 Green Ochre.


All of the little stones on the bases are then given a basecoat of Vallejo's 995 German Grey and roughly highlighted (to create a jagged uneven texture) with any lighter grey of your choice but personally I go with Vallejo's 992 Neutral Grey.

The sides of the bases are now painted Matt Black. I never used to bother with this BUT I've really gotten into the clean precise look this lends to the bases. I love it now.


Now we come to the final stage of the bases which is the covering. The static flock that I use is my own mix. I go for something that approximates the dead and dry grass you find on the Steppes with perhaps a little more green in it than usual. This allows an overall base aesthetic that can be used the length of Europe in my opinion.

To provide the final textural boost to the bases though I use a variety of clumps. I had a LOT of problems finding ones that I felt were suitable but after a couple of years I came across a company called Tajima Miniatures whose self adhesive tufts are without a doubt the best I have ever found. I use there stuff by the bucket load now, in great variety. 


These all add to the final colour and texture of the bases of this army.

Now that the bases and the miniatures are all squared away the only thing left to do is sort the guns themselves out...

So the painting of the guns is where the real complexity begins. I should also point out by the way that I have opted not to apply mud and spattering weathering to these artillery pieces as I kind of really like the clean look of them. They do have plenty of knocks and rusty battered parts which adds to the scheme but that is where I have chosen to draw the line.

The main paint scheme of the guns is done by airbrush using my MIG Aircobra for the Priming and Basecoating and my Harder & Steenbeck for all of the shading and highlighting as my H&S has a 0.15 needle and provides a hell of a lot more control... but the MIG is SOOOOO easy to clean it just makes sense to use it where I can...


The Airbrushing steps are as follows:
i) The model is primed with a Matt Black Etch Primer
ii) The basecoat is Tamiya's XF-58's Olive Green
iii) The first highlight is LifeColors UA221 Khaki Olive Drab applied in a panel highlight fashion
iv) The second highlight is LifeColors UA224 Olive Drab Faded Type 2 applied as above but a bit lighter and gathered in along the edges and prominent areas
v) The third highlight is a 50/50 mix of LifeColors UA224 Olive Drab Faded Type 2 with LifeColor 01 White. This is applied sparingly just along the edges and prominent areas.

So that's the airbrushing complete and don't be overly concerned if your third highlight was too heavy as the next step will, if done correctly will tone the whole contrasted effect down.

vi) Now we apply the Filter over the whole thing to unify the colour aesthetic and clip the contrast a little. I apply MIG's Filter 1506 Brown for Dark Green.
vii) Once dry wipe of any serious excess from where it may have pooled but otherwise leave it untouched.
viii) At this point I apply the first layer of Varnish. It doesnt matter which varnish you choose so long as it fixes the Filter layer as its an oil based layer.


Once the varnish is dry its time for the next layer which is where the real depth starts to come out.

ix) Over every detail laden part of the model apply a Wash. I use AK Interactives Wash 075 Wash for NATO Camouflage Vehicles. Don't be shy with this step. Slap it on aplenty! Then leave to dry for a while.
x) Once its dry use cotton buds (cue tips for you Yankees out there...) and use a gentle white spirit to wipe away the excess leaving great detail and shadowing around all of your detail areas and a general lowering of the overall chroma luminosity. Personally I use Winsor & Newtons Artists White Spirit as I had a bad experience with normal white spirit and have no wish to repeat the disaster!
xi) Once the whole piece is dry to the touch apply another layer of varnish to fix everything in place.


... once all of the actual painting steps proper have been squared away the last thing to do on the miniature is actually the rusted patches. For this just use an old kitchen sponge and dab on Vallejo's Panzer Aces 302 Dark Rust along the edges of the gun shield and other edges and spots across different patches of the model.

These Dark Rust elements then have the heaviest sections lined with Vallejo's Model Color 819 Iraqi Sand. These lines need to be very fine but also work well to work in as actual scratches into the overall paint scheme.

The very last thing that needs to be done with the painting is the wheel rims which are painted  with LifeColor's UA733 Tire Black and highlighted with Vallejo's Model Color 995 German Grey.

Varnish one final time with a super matt varnish and that as they say is that!

Remove from workspace and attach to the finished bases at your leisure!

Go have fun!